
Bullseye,
In this thread: http://www.guntalk-online.com/forum/viewtopic.php?t=190
You posted a picture of a "bushing washer" to replace the magazine disconnect on a MK III. Is this washer an aftermarket production item, or a DIY part?
Eventually I'm going to try for a MK II, but if not, I'll get a MK III and I will be removing the mag disconnect from it.
(Thought I'd start a new thread, rather than hi-jack the other one.)
Joe
Edited because I ment DIY (DO IT YOURSELF) rather than DYI (DO YOURSELF IT) Duhhhh.....
Bushing Washer for MK IIIs question
Moderators: Bullseye, Moderators


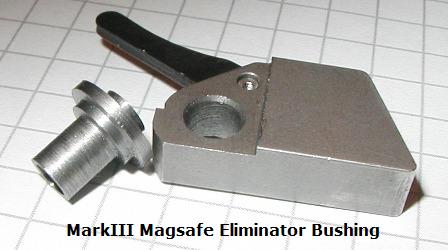
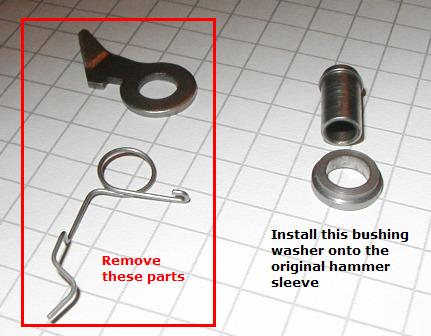
The part in question is one I made myself on the lathe. It is not available commercially, nor will I provide one to anyone who asks. (Believe me I've had several pleading requests already)
The washer is just something to take up the space in the frame and to keep the hammer from moving around inside the bolt channel. Several people have used regular flat washers to fill this void. I myself originally used a Mark II hammer with a Mark II bushing. You can get a VQ Mark II hammer and buy a bushing through Clarks by picking up one of their $15 oversized bushing and pin sets.
Somewhere in the forum I posted a drawing for a new bushing to eliminate the mag safety. I'll repost it.
Here's the actual drawing.
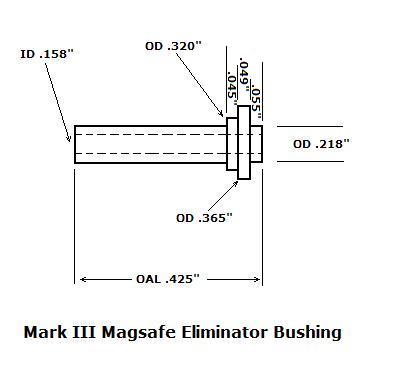
The special washer you saw is just the .049" and .045" portion of the drawing with a .218" through hole. It just slides onto the existing Mark III bushing in place of the disconnector hook and return spring.
Hope this helps.
R,
Bullseye
The washer is just something to take up the space in the frame and to keep the hammer from moving around inside the bolt channel. Several people have used regular flat washers to fill this void. I myself originally used a Mark II hammer with a Mark II bushing. You can get a VQ Mark II hammer and buy a bushing through Clarks by picking up one of their $15 oversized bushing and pin sets.
Somewhere in the forum I posted a drawing for a new bushing to eliminate the mag safety. I'll repost it.
Here's the actual drawing.
The special washer you saw is just the .049" and .045" portion of the drawing with a .218" through hole. It just slides onto the existing Mark III bushing in place of the disconnector hook and return spring.
Hope this helps.
R,
Bullseye
Last edited by Bullseye on Wed Jun 17, 2009 10:16 am, edited 1 time in total.


Before you take it down to add the washers order a VQ Sear from Rimfire. The $20 new sear makes a big difference in the trigger pull.
Go to your local Hardware Store, they have a large selection of thin and thick washers, go with the thin ones so you can adjust it for a good fit.
After all this, the mag flys out and the trigger pull is smooooooth.
Go to your local Hardware Store, they have a large selection of thin and thick washers, go with the thin ones so you can adjust it for a good fit.
After all this, the mag flys out and the trigger pull is smooooooth.
The Mark III's are a good product; you'll like it if you end up with one. The magazine release up on the side of the grip frame is worth all the rest in itself.
I'll second the recommendation for the VQ target sear and raise you a VQ Mark III adjustable trigger or a Marvel Trigger, both come with adjustable pretravel and overtravel screws installed.
R,
Bullseye
I'll second the recommendation for the VQ target sear and raise you a VQ Mark III adjustable trigger or a Marvel Trigger, both come with adjustable pretravel and overtravel screws installed.
R,
Bullseye
Should I pick up a MK III, I sure hope these VQ parts have good detailed instructions with them. If not I'll be yelling HELP!!!
In all the years I've had my old auto I've never had a pin out of the grip frame. For two reasons:
A> Never needed to,
and:
B> Some idjit staked all of them in. When they come out I need to replace all of them.
I hate it when people jury rig things. They had a cheep pair of hollow backed plastic grips on this pistol when I got it. Since the factory grips were solid on the back the pins started moving and they ended up staked.
So I have no idea how to take one of these pistols apart ..............yet.
J e
e
In all the years I've had my old auto I've never had a pin out of the grip frame. For two reasons:
A> Never needed to,
and:
B> Some idjit staked all of them in. When they come out I need to replace all of them.
I hate it when people jury rig things. They had a cheep pair of hollow backed plastic grips on this pistol when I got it. Since the factory grips were solid on the back the pins started moving and they ended up staked.
So I have no idea how to take one of these pistols apart ..............yet.
J
-
bearandoldman

- Ye Loquacious Olde Pharte

- Posts: 4194
- Joined: Tue Aug 16, 2005 10:30 am
- Location: Mid Michigan
The "apart taking" ia no real problem but the "together putting " can lea to less hair and a poor attitude.J Miller wrote:Should I pick up a MK III, I sure hope these VQ parts have good detailed instructions with them. If not I'll be yelling HELP!!!
So I have no idea how to take one of these pistols apart ..............yet.
J
Good luck, the VQ sear will make a world of difference in the trigger pull, you will like it.
You have great day and shoot straight and may the Good Lord smile on you.
J Miller,
I second all of Bullseye's advice but you'll have to choose between the MK11 and 111.
I've been tweaking both up lately and while I like the MK111 mag release, I just don't like the plastic LCI marring the look of an otherwise great looking pistol.
I have one MK11 678GC, one MK512 and one MK111 Hunter left and I think I'll keep the MK11GC when and if I get down to deciding which one to keep as my pet.
All are tack drivers so appearance would be the only difference to me.
One other thing to keep in mind. There are more grip options available right now for the MK11. Some of them are adaptable to the MK111 but require some fitting.
I suggest a MK11678GC if you don't want to get into parts swapping.About all that is needed is a little polishing of the internal parts, a VQ sear and the new VQ trigger to have a really good shooter.
There are still some MK11678GC's available but they are getting harder to find so you'll have to decide soon.
-
Georgezilla

- Master contributor
- Posts: 702
- Joined: Tue Apr 24, 2007 4:35 pm
George,
Two SAE #10 flat washers will do the trick. You can use steel or stainless. Disassemble your Mark III pistol and remove the magazine disconnector safety spring and the disconnector hook off of the hammer bushing pin.
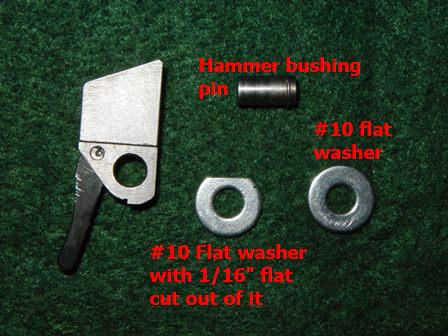
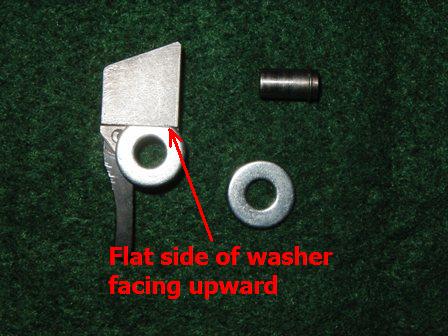
The washers will not work without some fitting. The inner washer will first need a flat spot, about 1/16" deep, cut out of the circumference to fit into the hammer cut out. This first cut will keep the lower washer in place, providing the necessary index spacing for the rest of the cuts on this washer.
There will be two more cuts made to this inner washer. The second cut will be the most critical. It is there to provide clearance for the sear face and the hammer hook. Line up the inner washer based on the first cut. Then draw an approximately 3/16” line across the bottom of the washer for the sear clearance. Now make the angled cut on the washer and then check for clearance with the hammer and the bushing pin. You should be able to see the entire hook under the washer. If the cut is not deep enough, then use a file to deepen it in a vise and recheck clearance. The third cut is one to dress the washer with the front face of the hammer. Draw a line and make the cut. This cut should be flush or slightly lower than the hammer’s front face. Dress all cuts with a file and deburr them as necessary. See picture below.
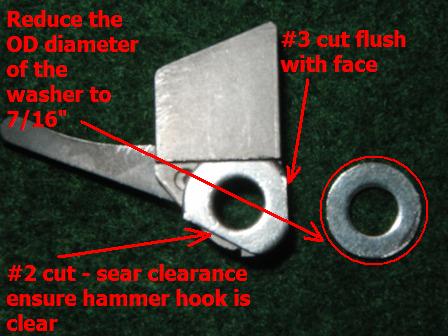
Now you must reduce the outer diameter of the second washer from 1/2" to 7/16”. This will provide the proper clearance for the sear face to reach the hammer hook when the entire assembly is put together. You can use a countersunk screw and a nut to hold it tight, then place it in a drill press and use a file to reduce the outer diameter. Deburr the washer afterwards for smooth operation in the pistol.
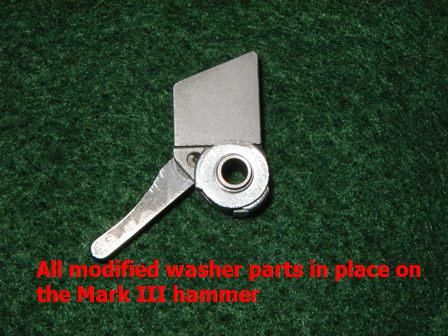

Install the entire assembly and check for clearance between the sear and hammer. Do this check with the receiver off the pistol, just in case there is a clearance issue. Use your thumb to catch the hammer when it is released by the sear. Once you are sure that the clearances are done, you are now ready to reassemble the pistol sans the magazine disconnector safety.
Hope this helps.
R,
Bullseye
Two SAE #10 flat washers will do the trick. You can use steel or stainless. Disassemble your Mark III pistol and remove the magazine disconnector safety spring and the disconnector hook off of the hammer bushing pin.
The washers will not work without some fitting. The inner washer will first need a flat spot, about 1/16" deep, cut out of the circumference to fit into the hammer cut out. This first cut will keep the lower washer in place, providing the necessary index spacing for the rest of the cuts on this washer.
There will be two more cuts made to this inner washer. The second cut will be the most critical. It is there to provide clearance for the sear face and the hammer hook. Line up the inner washer based on the first cut. Then draw an approximately 3/16” line across the bottom of the washer for the sear clearance. Now make the angled cut on the washer and then check for clearance with the hammer and the bushing pin. You should be able to see the entire hook under the washer. If the cut is not deep enough, then use a file to deepen it in a vise and recheck clearance. The third cut is one to dress the washer with the front face of the hammer. Draw a line and make the cut. This cut should be flush or slightly lower than the hammer’s front face. Dress all cuts with a file and deburr them as necessary. See picture below.
Now you must reduce the outer diameter of the second washer from 1/2" to 7/16”. This will provide the proper clearance for the sear face to reach the hammer hook when the entire assembly is put together. You can use a countersunk screw and a nut to hold it tight, then place it in a drill press and use a file to reduce the outer diameter. Deburr the washer afterwards for smooth operation in the pistol.
Install the entire assembly and check for clearance between the sear and hammer. Do this check with the receiver off the pistol, just in case there is a clearance issue. Use your thumb to catch the hammer when it is released by the sear. Once you are sure that the clearances are done, you are now ready to reassemble the pistol sans the magazine disconnector safety.
Hope this helps.
R,
Bullseye
-
Georgezilla
- Master contributor
- Posts: 702
- Joined: Tue Apr 24, 2007 4:35 pm
I took this post and added to the stickies in the Workshop Forum. It has the tools and materials listed separately for performing the modification. If you have any questions you may want to look there. Here's a link.
http://www.guntalk-online.com/forum/viewtopic.php?t=387
R,
Bullseye
http://www.guntalk-online.com/forum/viewtopic.php?t=387
R,
Bullseye
-
Georgezilla
- Master contributor
- Posts: 702
- Joined: Tue Apr 24, 2007 4:35 pm