
Sorry, I just re-read your postings and you had already stated the same..
I think generally, the vq sear and bushing would be the main contributor to improvement...
I'm flumoxed...
Need help with Mark II trigger problem
Moderators: Bullseye, Moderators
-
greener
I'd do just the VQ sear and trigger, rather than the accurizing kit. There isn't much difference between the trigger/sear and trigger/sear/hammer upgrades.mwwilkew wrote:I checked and the disconnector lever is straight/flat. Picked up some 600 grit sandpaper and touched up the disconnector lever and square hole, the hammer spur, and the hammer pin hole on the right side of the frame. Couldn't find any other spots that needed a touchup..Then I reassembled with no improvement. Next, I took the sear from the MkIII and reassembled the MkII...till no improvement. Still need to rack the bolt, pull trigger back till I hear the "re-set click", then pull trigger again to drop the hammer.
I obviously need to get a new sear, but was thinking about doing the VQ accurizing kit even before I picked up the MkII. Think the VQ kit will resolve this problem?
-
blue68f100

- Master contributor

- Posts: 1997
- Joined: Mon May 25, 2009 10:31 pm
- Location: Piney Woods of East Texas
You do not need the full kit, just the sear and optional trigger (gives you external adj). There are a lot of parts that you will not use in the kit. I would add the Clark MKII Bushing to the parts list to remove the slop in the bushing/hammer that may be contributing to your hammer release problem. All play here adds to the travel the sear must move in order to release the hammer. Normally there is only ~0.015"-0.020" travel needed for the sear to release the hammer. If you have play in the Hammer/Bushing/Pin this adds to the travel in the way of creep. I have seen as much as an additional 0.005" which is an extra 25% travel. Get the Clark Bushing.
Save your self some money and just get the VQ sear, trigger and Clark MKII Bushing.
You have had enough grief with this problem, fix it for good and get the best trigger you can.
Save your self some money and just get the VQ sear, trigger and Clark MKII Bushing.
You have had enough grief with this problem, fix it for good and get the best trigger you can.
David
SS MKIII 6 7/8" Fluted Hunter. Mueller Quick Shot, Bushnell 2x Scope, Hogue Rubber Grips
Custom Built 1911
SS MKIII 6 7/8" Fluted Hunter. Mueller Quick Shot, Bushnell 2x Scope, Hogue Rubber Grips
Custom Built 1911
-
greener
-
blue68f100
- Master contributor
- Posts: 1997
- Joined: Mon May 25, 2009 10:31 pm
- Location: Piney Woods of East Texas
Good point the sears are the same between the 2 models. The Clark bushing may fix every thing by eliminating excess play the sear has to move. If all else fails he will need to do a little file work to the disconnector or sear. But that can/will move the release point on the trigger back, which is ok if he has excess travel.
David
SS MKIII 6 7/8" Fluted Hunter. Mueller Quick Shot, Bushnell 2x Scope, Hogue Rubber Grips
Custom Built 1911
SS MKIII 6 7/8" Fluted Hunter. Mueller Quick Shot, Bushnell 2x Scope, Hogue Rubber Grips
Custom Built 1911

I believe the sear spring is installed correctly. I've had it out a few times now and it looks like the photo in the instructions. I'd be happy to post a picture but don't have time today and probably won't have time til next weekend. In the meantime I'll order a few parts and give an update when I get them installed.
Thanks again for all the help.
Thanks again for all the help.


I saw that you tried the disconnector and hammer engagement with the receiver off and the mainspring housing installed, but I did not understand if the hammer worked 100% with the receiver off. Sometimes the receiver tube can actually interfere with the disconnector lever and this test will eliminate the receiver position as a source for the problem. I did see some wear on the marking ink that indicates this could be a possibility.
R,
Bullseye
R,
Bullseye

Clark bushing question...I'd call Clark but they're already closed.
I just received the VQ and Clark parts that will hopefully resolve my problem. I'm in the process of reassembling with the new parts but the Clark Hammer Bushing won't simply slide into the hammer. How tight should this be? Should I force it in, or is this a custom fit with some light sanding of the bushing?
Thanks...
-
blue68f100
- Master contributor
- Posts: 1997
- Joined: Mon May 25, 2009 10:31 pm
- Location: Piney Woods of East Texas
It's a force fit. If you can not seat it with your hands, use a small hammer to force it down. But do not damage the end, use something to go around it like a socket. Normally it does not take much to do.
Or if you do not want to force it, do the thermal fit. Put the hammer in the oven at 250F for 20 min, and the bushing in the freezer for 30 min, then the bushing will drop it in.
Or if you do not want to force it, do the thermal fit. Put the hammer in the oven at 250F for 20 min, and the bushing in the freezer for 30 min, then the bushing will drop it in.
David
SS MKIII 6 7/8" Fluted Hunter. Mueller Quick Shot, Bushnell 2x Scope, Hogue Rubber Grips
Custom Built 1911
SS MKIII 6 7/8" Fluted Hunter. Mueller Quick Shot, Bushnell 2x Scope, Hogue Rubber Grips
Custom Built 1911
Back to square one?
I've installed a Clark oversize hammer pin and bushing along with the VQ accurizing kit (trigger, plunger, plunger spring, sear, sear spring, hammer, etc.). Everything went together nicely (thanks for the tip blue). But...I'm still experiencing the same initial problem. I should have time to post pics or maybe a video on Sunday afternoon. I think the only thing I haven't replaced is the disconnector.
I've installed a Clark oversize hammer pin and bushing along with the VQ accurizing kit (trigger, plunger, plunger spring, sear, sear spring, hammer, etc.). Everything went together nicely (thanks for the tip blue). But...I'm still experiencing the same initial problem. I should have time to post pics or maybe a video on Sunday afternoon. I think the only thing I haven't replaced is the disconnector.
Finally have time to get back to this.
Yes, the trigger operation is more consistent with the receiver off the frame and bolt stop installed. The trigger seems to work properly every time (the VQ trigger is nice). Can I install my Mk III receiver on this Mk II for comparison to see if I have the same problem?
Yes, the trigger operation is more consistent with the receiver off the frame and bolt stop installed. The trigger seems to work properly every time (the VQ trigger is nice). Can I install my Mk III receiver on this Mk II for comparison to see if I have the same problem?
Sure you can install the Mark 11 receiver on the Mark III frame as long as it is the same style of pistol. No 22/45 on a regular frame or the opposite.
Your disconnector may be rubbing on the inside of the receiver tube. Look inside the tube with the bolt out, like in this picture.
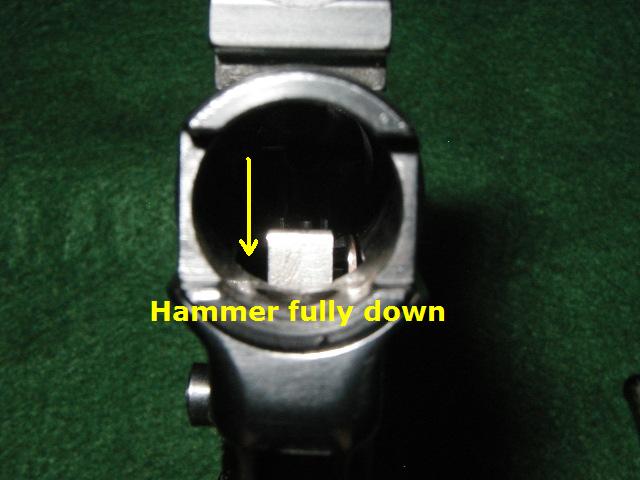
Check to ensure that you have clearance between the disconnector and the tube. (It is shown just to the right of the hammer in the picture) If not then there is your problem. I thought I noticed some rubbing on that top portion of your disconnector in the pictures where you had used the marker. The ink is clearly rubbed off the front outside portion of the disconnector in this picture. http://i21.photobucket.com/albums/b299/ ... G_8832.jpg You may have to bend the top of the disconnector, ever so slightly, over toward the left.
R,
Bullseye
Your disconnector may be rubbing on the inside of the receiver tube. Look inside the tube with the bolt out, like in this picture.
Check to ensure that you have clearance between the disconnector and the tube. (It is shown just to the right of the hammer in the picture) If not then there is your problem. I thought I noticed some rubbing on that top portion of your disconnector in the pictures where you had used the marker. The ink is clearly rubbed off the front outside portion of the disconnector in this picture. http://i21.photobucket.com/albums/b299/ ... G_8832.jpg You may have to bend the top of the disconnector, ever so slightly, over toward the left.
R,
Bullseye
I think you've got it Bullseye. I assembled w/o the bolt and can see that the disconnector is rubbing on the side of the receiver tube where the sharpie was rubbed off. I can now also see a wear spot (shiny spot on the blued receiver) on the inside of the receiver where the disconnector is rubbing.
I'll try to adjust the fit tomorrow and give an update. Thanks again for all your help.
I'll try to adjust the fit tomorrow and give an update. Thanks again for all your help.