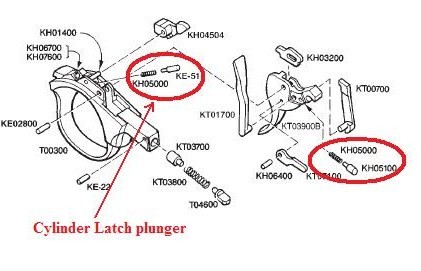
I posted this GP-100 trigger group exploded view in an earlier thread-
In the earlier thread,
http://www.guntalk-online.com/forum/vie ... php?t=1694 , the cylinder was failing to latch. Perhaps the picture will be of assistance for you with reassembly. Your problem sounds like a part is installed improperly, but which one is causing the problem without being able to see the parts, is a difficult call to make.
Here's a procedure to help with GP-100 trigger group reassembly. Before beginning, there are two plunger and spring sets - Ensure you have the shorter spring with the trigger pawl plunger as the cylinder latch plunger gets the longer spring.
First, insert the trigger return/trigger guard latch spring (part# KT03800). Insert the trigger guard latch (part# T04600) with the flat surface up. Hold the latch in with your left thumb against spring tension while inserting the latch-retaining pin (part# KE-22) into the hole with your right hand. Make sure the retaining pin is flush on both sides. Hold the trigger all the way back with your left hand and middle finger. Insert the pawl spring and plunger (parts# KH05000 & KH05100) into the hole of the trigger, just under the cam surface. Apply a small drop of oil to the plunger. Start the pawl shaft into the hole with the pawl leaning forward. Be sure to push the plunger down while sliding the pawl in.
Note: the plunger and spring are notorious for launching. (As you've previously discovered) This step is best done inside a clear plastic bag to prevent losing the plunger & spring.
Once the pawl is in all the way, position it vertically and allow the trigger to move forward. Pull the trigger back slightly, apply a small drop of oil to the transfer bar lug then insert the transfer bar (part# KT01700) into the hole opposite the pawl. Allow the trigger to spring forward to retain both the transfer bar and pawl. Set the trigger guard assembly aside for now.
Next, it is time for reassembly, pick up the frame and ensure the cylinder is latched closed in the frame. Apply a drop of oil to the trigger pivot pin and trigger plunger. Hold the gun with the muzzle down and insert the front tab of the trigger guard assembly into the frame notch. Snap the trigger guard assembly into position.
Note: if the trigger guard assembly doesn’t snap in, don’t force it. Chances are the transfer bar or the pawl is not positioned properly. You may be able to position the parts by inserting a guide wire through the hammer slot. Once the trigger guard assembly is snapped in, make sure it is fully latched and the surfaces of the frame mate with the surfaces of the trigger guard assembly. Pull the trigger all the way back and hold it there. Drop the hammer into the slot. Turn the gun sideways with the serial number side up. Align the hammer’s frame hole with the hammer hole. Apply a drop of oil on the hammer pivot pin then insert it into the frame. Release the trigger. With the hammer fully forward, insert the hammer strut assembly in the grip frame. The straight edge of the strut goes up. The notched end of the strut seat goes down with the flat surface to the front. Cock the hammer and remove the disassembly pin. Apply a few drops of oil along the hammer spring. Pull the trigger and ease the hammer down. Slip the rubber grip over the grip frame until the big hole in the grip aligns with the hole in the grip frame. Slide the grip panel locator into position with an equal amount of pin extending from both sides. Lay the disassembly pin in the slot at the bottom of the left side. Snap the left grip insert into position. Snap the right grip insert into position. Insert the grip screw from the right side and tighten it with a screwdriver. Dry fire the gun several times to make sure everything is installed and working properly.
Hope this helps.
R,
Bullseye