Scope question

The place to discuss the inner workings of firearms.

Moderators: Bullseye, Moderators

User avatar
Bullseye
Site Admin/Host
Site Admin/Host
Posts: 6384
Joined: Sun Aug 14, 2005 12:23 pm
Location: USA

Post by Bullseye » Sat Jul 01, 2006 9:13 am

gcp,

I'm glad that I was not available to answer your question right off. It appears that Toy has given you some very sound advice.

First let me say I can describe the process for drilling and tapping your pistol's scope mount. But the question is: Do you really want to take this project on? For the first time there is an equal chance of messing it up as there is successfully adding the mount. Those odds exponentially decrease as the lack of proper tools and knowledge enter into the picture. Since you sent back a mount that you didn't like the appearance; I'll assume that cosmetics is an important factor in how you want to proceed.

The required tools. This is not a job for a 12" Craftsman table top drill press. You'll also need some specialized taps and some high quality cobalt screw machine length drill bits. The machine length bits are stiffer and have a reduced wobble factor, thereby increasing your success rate. You'll need the proper sized taps, that's right more than one. A starter tap, taper tap, and bottoming tap, high speed steel taps will work fine for this application. I use a center point drill for finding the exact location of the screw holes and to also prevent bit walking when I drill later with the screw length drill bit. You'll need adequate padding for your vise jaws to prevent damage to the finish of your receiver. A good tap handle for using the taps and to reduce the chance of one from breaking in the receiver. I use the end mill to drill all my holes and align my taps, but you don't have one, so a good tap guide is needed to ensure straight and level threading and no cross-threading of the hole. You'll need some quality tap lube ( like Tap Magic) to ensure proper lubrication of the tap's cutting flutes and decrease the chance of binding or breaking a tap.

The set-up is the key. A poor set-up will result in a poor job. I use a machinist's level to ensure all my work is aligned/mounted properly before I ever start drilling or tapping anything.

Ok, I think you 're probably getting the picture here, there's a lot more to this than just drilling a few holes in some metal. I'm a DIY advocate, but this is not really a DIY job, at least unless you're really confident with your skills and tools. You can easily spend a lot of money to buy the right tools for the job, or wait the month and a half for the gunsmith, who already has the right tools, to do the job for you. He has the advantage of economy of scale, the more scope mounting jobs he does, the more cost effective his original outlay for the tools and materials to do the job was.

I'm not saying don't do it, but what I'm saying is do some serious risk analysis before doing it. Is the risk worth the effort, or is waiting the more prudent thing to do? Your call. I'll tell you more on how exactly to do this, if your choice is to proceed. Or there is another option.

You could install a no-gunsmith mount onto your receiver. This type of scope mount uses the receiver's dovetail to affix the mount to the pistol, and these work very good. There are a couple out there on the market like Weigand or MGW.

Image

Image

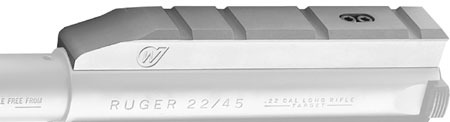
These mounts just require rear sight removal and then tightening up the allen screws for a secure fit. This type of mount works great and is easily owner installed. By the time someone acquired the proper tools for a drill and tap job they would've exceeded the price for one of these mounts. Usually they retail for around $39.95 and you can see how to remove the old sight at my detailed stripping page. http://www.guntalk-online.com/detailstrip.htm#sight

Here are the options available to you, now you have to decide what is next.

Hope this helps.

R,
Bullseye
Image

User avatar
gcp
Advanced contributor
Posts: 262
Joined: Wed Jun 21, 2006 7:14 am

Post by gcp » Sun Jul 02, 2006 11:37 am

Guys, thank you so very much for the detailed information you provided, top notch as usual.

After talking it over with my gunsmith friend, and reading what you had to say, I decided to have it done professionally. So, I have an appointment with a machine shop tomorrow evening so I might get it done there, if I decide that the machinist can be trusted.

But, no one’s commented on my jbweld idea....superglue won't do it I've tried.

Also, after 2 emails I’ve yet to hear back from Rimfire Sports, are they usually this tardy?

User avatar
toyfj40
Master contributor
Master contributor
Posts: 672
Joined: Wed Aug 17, 2005 11:32 am
Location: 76101

Post by toyfj40 » Sun Jul 02, 2006 12:48 pm

gcp wrote:have it done professionally.
no one’s commented on my jbweld idea...
superglue won't do it, I've tried.

Also, after 2 emails I’ve yet to hear back from Rimfire Sports,
are they usually this tardy?
JBweld: go ahead and try it. please let us know how many
rounds it takes to come-loose... and if you're using
Sub/ Std/ Hi/ Hy velocity rounds...

rfSports: I've always had good response/service.
I think he's a One-Man-Shop and may be taking a
holiday-trip...

User avatar
gcp
Advanced contributor
Posts: 262
Joined: Wed Jun 21, 2006 7:14 am

Post by gcp » Sun Jul 02, 2006 2:26 pm

Yea, I figured he might be off for the holidays....

I could jbweld and drill/tap later but it'll be a mess if I ever wanted to take the mount off. I think I'll just have it drill/taped instead.

User avatar
Bullseye
Site Admin/Host
Site Admin/Host
Posts: 6384
Joined: Sun Aug 14, 2005 12:23 pm
Location: USA

Post by Bullseye » Sun Jul 02, 2006 3:38 pm

I did not think you were originally serious about using JB Weld on the receiver and scope mount. This would be a permanent alteration that could not be undone without seriously deforming the finish of your firearm.

R,
Bullseye
Image

User avatar
gcp
Advanced contributor
Posts: 262
Joined: Wed Jun 21, 2006 7:14 am

Post by gcp » Mon Jul 03, 2006 7:36 am

One can break JB weld off, and without permanently defacing the pistol, but it definitely will prove more of a task than simple screw removal. But after it’s all said and done I think I’ve made the right choice by not using JB weld...as picky as I am it would be a source of unnecessary and constant suspicion.

I’ll post pics as soon as it is finished, thanks again for all your help!!

BTW, it's good to be among you, this is a very civil forum.....

User avatar
Bullseye
Site Admin/Host
Site Admin/Host
Posts: 6384
Joined: Sun Aug 14, 2005 12:23 pm
Location: USA

Post by Bullseye » Mon Jul 03, 2006 9:48 am

Your most welcome. We're happy (and fortunate) to have members, such as yourself, as part of this discussion forum. I look forward to seeing those pictures of your pistol. Your machinist should have no problem drilling and tapping your gun. That is clearly the best way to mount your scope. If it wasn't, then Ruger would not be predrilling and tapping all their new adjustable sight receivers. This type of mounting is very flexible, if you decide to take the mount off, then you can always fill the holes with blank off screws.

R,
Bullseye
Image

User avatar
bearandoldman
Ye Loquacious Olde Pharte
Posts: 4194
Joined: Tue Aug 16, 2005 10:30 am
Location: Mid Michigan

JB Weld

Post by bearandoldman » Mon Jul 03, 2006 12:38 pm

gcp wrote:One can break JB weld off, and without permanently defacing the pistol, but it definitely will prove more of a task than simple screw removal. But after it’s all said and done I think I’ve made the right choice by not using JB weld...as picky as I am it would be a source of unnecessary and constant suspicion.

I’ll post pics as soon as it is finished, thanks again for all your help!!

BTW, it's good to be among you, this is a very civil forum.....
Glad to hear that you have decided to wait and have someone with experience do the job. JB Weld would be effective but just alittle on thwe crude side. In my experience with JB Weld, if is put on properly
cleaned surface it just about becomes part of the unit, probably woud not come off without doing some damage to the surface of the reciever. No sense messing up a good looing gun just to save a few bucks or a little time, We do then to get anxious don't we, I kbnow where you are coming from. Her is one of my 22/45's with a Rugar Weaver style rail.
Image
You have great day and shoot straight and may the Good Lord smile on you.
Image

User avatar
gcp
Advanced contributor
Posts: 262
Joined: Wed Jun 21, 2006 7:14 am

Post by gcp » Sat Jul 15, 2006 8:28 pm

Gentlemen, it's finally done! After the machine shop guy didn't come through for me I took a 100 mile road trip today to take my Mark II to a very fine gunsmith I've used in the past.

He drilled and tapped the pistol, installed the scope mount, and "ironed" the feeding ramp for $30. It was a real pleasure to watch him work once again!

Image

Image

I think I am going to like this set-up....and btw, he measured my trigger pull to a grand total of 28oz, and all that from a simple sear swap :D You guys are tops!

User avatar
toyfj40
Master contributor
Master contributor
Posts: 672
Joined: Wed Aug 17, 2005 11:32 am
Location: 76101

Post by toyfj40 » Sun Jul 16, 2006 12:55 am

gcp wrote:He drilled and tapped the pistol, installed the scope mount, and
"ironed" the feeding ramp for $30.
you need to get his permission to post his Name/ Addr/ PH/ eMail/ Web...
I presume "ironed" means polished?
Glad you got fixed-up. keep us posted on how it (you) shoots...

User avatar
gcp
Advanced contributor
Posts: 262
Joined: Wed Jun 21, 2006 7:14 am

Post by gcp » Sun Jul 16, 2006 6:47 am

toyfj40, I will request his permission but I kinda doubt he would be interested in acquiring additional work. See, he is retired and accepted to do this to help me out of my predicament, but I will ask.

On ironing out, yes he did polish the feeding slide but he also used a special tool (looked like a T-handle screw driver with a bit at the end of it) to remove potential burs and polish the face of the receiver, where the round seats. He also used a small level to check flatness on the top/bottom of the receiver, and rear sight. He said that a lot of Rugers are not consistently flat but happily mine was pretty good.

User avatar
toyfj40
Master contributor
Master contributor
Posts: 672
Joined: Wed Aug 17, 2005 11:32 am
Location: 76101

Post by toyfj40 » Sun Jul 16, 2006 12:58 pm

gcp wrote:a T-handle screw driver with a bit at the end of it,
to remove potential burs and polish the face of the receiver,
where the round seats.
my comment was sorta-rhetorical... just a way to compliment his work,
but if he might be interested in getting work from a select-group of
Ruger-affectianados as us... :roll:

He might have been using a "swag iron".
the "bit" surface is not abrasive/ cutting. it is smooth
and used to PRESS the burrs on the chamber, not cut/file them.
Image

User avatar
gcp
Advanced contributor
Posts: 262
Joined: Wed Jun 21, 2006 7:14 am

Post by gcp » Sun Jul 16, 2006 2:55 pm

Yep, that's the tool.

User avatar
Bullseye
Site Admin/Host
Site Admin/Host
Posts: 6384
Joined: Sun Aug 14, 2005 12:23 pm
Location: USA

Post by Bullseye » Sun Jul 16, 2006 3:55 pm

gcp,

Your pistol looks very nice. I'm looking forward to hearing how much more you enjoy it now that the scope is mounted. Adding a VQ sear can really make a huge difference in the feel of the trigger, one I'm sure you'll like.

R,
Bullseye
Image

User avatar
gcp
Advanced contributor
Posts: 262
Joined: Wed Jun 21, 2006 7:14 am

Post by gcp » Sun Jul 16, 2006 5:46 pm

I know I'll love it bullseye but I've got a question, where should I ultimately locate the scope, closer to the rear sight or where it is now? Feels kind of front heavy at its present location but I've not shot it yet...

Post Reply