Couple of comments. (1) on disassembly the ball detent on the safety stayed in place, which made me wonder about the warnings. After that, every time I touched the safety, the ball detent seemed to jump out of the safety. (2) the magazine disconnector that came in my pistol didn't look anything like the one in Ruger's parts diagram or the detail strip. I took loads of pictures, but the one I didn't take was what it looked like coming out of the pistol. (3) after the first install of the VQ hammer, the hammer movement felt like it was binding, I went back and installed the original hammer, which didn't bind, and then reinstalled the VQ hammer, without problem (other than the ball detent deciding it need another trip).
Mark III Upgrade-Detail strip
Moderators: Bullseye, Moderators
-
greener
Mark III Upgrade-Detail strip
Just went through replacing the trigger, sear and hammer on my Mark III with the VQ parts. Great way to spend an evening! The instructions on http://www.guntalk-online.com/detailstrip.htm made it clear enough so that even a 10-thumbed mechanical idiot could bumble through it. Great set of instructions. Although the instructions that came with the parts were pretty good, I believe I'd still be trying to get back together. Great job on the instructions, Bullseye!!

Couple of comments. (1) on disassembly the ball detent on the safety stayed in place, which made me wonder about the warnings. After that, every time I touched the safety, the ball detent seemed to jump out of the safety. (2) the magazine disconnector that came in my pistol didn't look anything like the one in Ruger's parts diagram or the detail strip. I took loads of pictures, but the one I didn't take was what it looked like coming out of the pistol. (3) after the first install of the VQ hammer, the hammer movement felt like it was binding, I went back and installed the original hammer, which didn't bind, and then reinstalled the VQ hammer, without problem (other than the ball detent deciding it need another trip).
Couple of comments. (1) on disassembly the ball detent on the safety stayed in place, which made me wonder about the warnings. After that, every time I touched the safety, the ball detent seemed to jump out of the safety. (2) the magazine disconnector that came in my pistol didn't look anything like the one in Ruger's parts diagram or the detail strip. I took loads of pictures, but the one I didn't take was what it looked like coming out of the pistol. (3) after the first install of the VQ hammer, the hammer movement felt like it was binding, I went back and installed the original hammer, which didn't bind, and then reinstalled the VQ hammer, without problem (other than the ball detent deciding it need another trip).


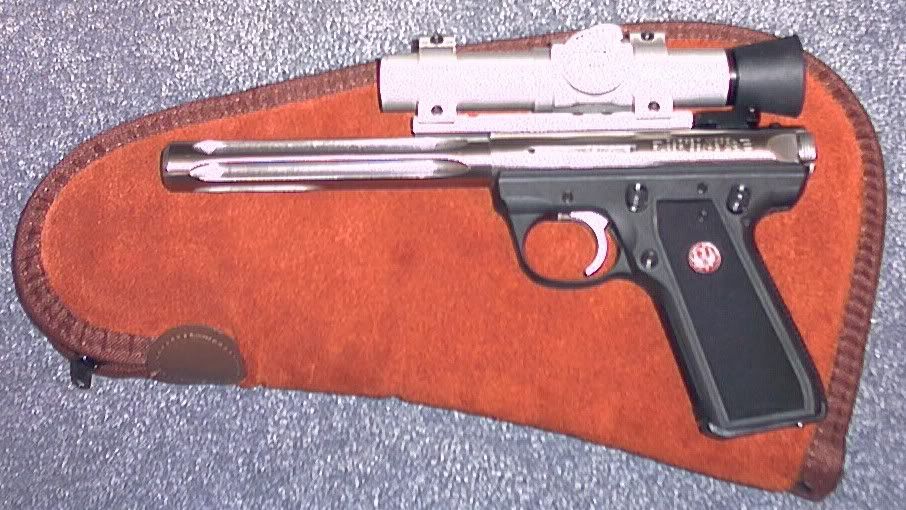
Did your's look like this one?

In the detail strip box there's a little sentence that goes like this, "Hey! My Mark III mag disconnector doesn't look like that. If it looks like this one, it's OK, your's is just newer and installs the same." You probably just missed that, you were busy trying to read all the details. Maybe I need to bring that out more clearly in the procedures.
All the new Mark III's have the hooked mag disconnect levers in them, when I did those pictures I didn't have one handy so I used mine for the photographs. I have one of the first Mark III's off the line.
That tiny detent ball can be a real pain. Sometimes it comes out, other times it doesn't. The problem is, it usually manages to pop-out when you least expect it or can least afford it. Boomer sent me a detent ball retention tip, I just haven't added it into the troubleshooting page yet. I'm planning on adding a modification procedures page (like the troubleshooting page) and I definitely will have it on that page. Packing the detent ball hole with petroleum jelly or moly grease will also keep in held fast in its little nook.
Which VQ trigger did you install? Where did you purchase it?
I'm very pleased that those instructions were helpful to you. Thank you for those kind words.
If you wish to share any of those pictures let me know, I can put them on the Guntalk server.
R,
Bullseye[/img]

-
greener
Now that you mention the "mine doesn't look like that" I remembered seeing it in the past. The pictures I didn't take were the hammer, magazine release and spring from both sides.
I bought the upgrade thrugh Rimfire Sports & Custom. Excellent folks to buy from. I made an initial order, then decided to do the whole accurizing kit and changed the order. They picked up the change and hardly missed a beat. The trigger was the VQ trigger with pre and post travel screws. I installed the extended bolt release and decided that I don't like it as well as the original. I'm going to fire the pistol in the next couple of days and probably will break it down again to replace the release. Will take the photos I think I missed then and will send you all that looked good. I had a couple that looked ok on the camera and didn't look that good on the screen. Since I may do this again in a few months, I want the practice. My son gets a combined Christmas/Birthday present and is hard to buy for: his gun collection is much better than mine and his tool collection (50% mine) is much better. He has a Mk II, and an upgrade kit, installed, might be something worth considering.
I bought the upgrade thrugh Rimfire Sports & Custom. Excellent folks to buy from. I made an initial order, then decided to do the whole accurizing kit and changed the order. They picked up the change and hardly missed a beat. The trigger was the VQ trigger with pre and post travel screws. I installed the extended bolt release and decided that I don't like it as well as the original. I'm going to fire the pistol in the next couple of days and probably will break it down again to replace the release. Will take the photos I think I missed then and will send you all that looked good. I had a couple that looked ok on the camera and didn't look that good on the screen. Since I may do this again in a few months, I want the practice. My son gets a combined Christmas/Birthday present and is hard to buy for: his gun collection is much better than mine and his tool collection (50% mine) is much better. He has a Mk II, and an upgrade kit, installed, might be something worth considering.
A word about the pretravel screw. If you fire a shot and then cannot fire a second one, then your pretravel screw is set in too far. Be careful, only the slightest turn makes a huge difference in the pretravel adjustment. You need a little slack for the disconnector lever to reset on the sear. But that is just a very little bit.
Rimfire is a good outfit. I've had some good, and a few bad, experiences with them but overall they are excellent. If I only had good experiences, I'd be a little suspicious. This is why I recommend them to people, because they are giving 100% and they have outstanding customer service. They don't have to be perfect, just do their best to satisfy the customers.
Don't sell yourself short on those pictures. A lot of the shots I take end up getting cropped or enhanced just to spotlight one component. There's some jewels in there, you just got to find them. I look forward to seeing your pictures.
R,
Bullseye


Bullseye,
The biggest problem I had with reassembly of the MK III 22/45 was the proper assembly of the Magazine disconnecter, spring and hammer.
A good picture of the correct placement of spring and lever would be a great help. (IMHO)
The biggest problem I had with reassembly of the MK III 22/45 was the proper assembly of the Magazine disconnecter, spring and hammer.
A good picture of the correct placement of spring and lever would be a great help. (IMHO)
Bud
Beware the man who only has one gun.
HE PROBABLY KNOWS HOW TO USE IT!!!
Beware the man who only has one gun.
HE PROBABLY KNOWS HOW TO USE IT!!!
-
greener
Yeah, it only took me half of forever to get that put together, then the hammer didn't feel right, so redid it with the old hammer, that felt right, and redid it with the new hammer. Somewhere along the way, I got to feeling like I didn't need all four hands to keep everything together. I found that lining up the everything for the hammer pivot pin to be a challenge.Bud33 wrote:Bullseye,
The biggest problem I had with reassembly of the MK III 22/45 was the proper assembly of the Magazine disconnecter, spring and hammer.
A good picture of the correct placement of spring and lever would be a great help. (IMHO)
Bud33 wrote: reassembly of the MK III 22/45 was the proper assembly of the Magazine disconnecter, spring and hammer.
The half-dozen times I've tackled the HammerPin assemblygreener wrote: need all four hands to keep everything together. I found that lining up the everything for the hammer pivot pin to be a challenge.
I've ended up with my tongue tied in such knots that I couldn't talk for two days.
If there's a trick, jig or method... I'd sure like to know about it.
I suspect it is more like 'riding a bike'... after the seventeenth or thirty-third time..
it just starts to get easier... as with a lot of 'skills' in this life.
Some (me, at first) are intimidated by 'field-stripping'...
but somewhere along the line, that become "easy"... ONCE I learned how.
as Red Green would say: "Hang in there... we're pulling for ya..."
(... Hmmm maybe Duct-Tape would help... nahhh )

Re: Mark III 22/45 Upgrade-Detail strip
Installed a new VQ MarkII Hammer this morning, to go along with the VQ Sear I installed earlier. All the parts came from Rimfire. With the help of Bullseye, I now have a real smooth crisp trigger pull. I can't see installing the a new trigger because it feels perfect now. The pretravel is just right for me and the overtravel isn't a probelm.
Went to the range to test it out, lots of Bullseyes thank to Bullseye.
Went to the range to test it out, lots of Bullseyes thank to Bullseye.
-
greener
I've done this 4 times in two days, it is so much fun. What I did the last time (see photo) was to pin the thumb safety and the bolt release with the hammer pivot pin. I then dropped the hammer-mag disconnect assembly into the receiver as shown in Bullseye's detailed strip, but held it in from the right side with another pin (in my case, it was a jeweler's screwdriver). This kept the trigger spring in, kept everything from popping up and allowed me to fiddle with lining up the hammer. This seems to make holding it all together and lining it up a bit easiertoyfj40 wrote:Bud33 wrote: reassembly of the MK III 22/45 was the proper assembly of the Magazine disconnecter, spring and hammer.The half-dozen times I've tackled the HammerPin assemblygreener wrote: need all four hands to keep everything together. I found that lining up the everything for the hammer pivot pin to be a challenge.
I've ended up with my tongue tied in such knots that I couldn't talk for two days.
If there's a trick, jig or method... I'd sure like to know about it.
I suspect it is more like 'riding a bike'... after the seventeenth or thirty-third time..
it just starts to get easier... as with a lot of 'skills' in this life.
Some (me, at first) are intimidated by 'field-stripping'...
but somewhere along the line, that become "easy"... ONCE I learned how.
as Red Green would say: "Hang in there... we're pulling for ya..."
(... Hmmm maybe Duct-Tape would help... nahhh )
http://i111.photobucket.com/albums/n159 ... meretc.jpg
Last edited by greener on Fri Aug 25, 2006 9:36 pm, edited 1 time in total.
-
greener
Played with the pretravel screw. Got it to the point the disconnector wouldn't reset the sear. Backed off and got a "click" then backed off some more.Bullseye wrote:A word about the pretravel screw. If you fire a shot and then cannot fire a second one, then your pretravel screw is set in too far. Be careful, only the slightest turn makes a huge difference in the pretravel adjustment. You need a little slack for the disconnector lever to reset on the sear. But that is just a very little bit.
R,
Bullseye
-
greener
Too hot to go to the range today and I didn't like the extended bolt release. So, just for fun, I detailed stripped it and took a few more pics. Where do you want them?Bullseye wrote:
Don't sell yourself short on those pictures. A lot of the shots I take end up getting cropped or enhanced just to spotlight one component. There's some jewels in there, you just got to find them. I look forward to seeing your pictures.
R,
Bullseye
-
greener
In the detail srip procedure, it shows pressing down on the trigger pivot retaining spring with the disconnector assembly horizontal. I couldn't find anything that made this easy to do. However, if you raise the disconnector assembly to the vertical, it opens access to the spring and everything is much easier.
-
greener
Toy: I've used the word "fun" a couple of times with the detailed strip. The first couple of times I put the hammer assembly back in "fun" was having the ball detent on the thumb safety fall out about a dozen times, having the bolt release wander up and bind the hammer pivot pin. The most fun was lining up the holes for the hammer pivot pin, with the thumb safety coming loose and the ball detent falling out. I'm ready to take up gunsmithing if I can get paid by the hour and not by the job. LOL.
I have an assortment of needle-nose pliers of various angles/lengthsgreener wrote:I put the hammer assembly back in, the ball detent on the thumb safety falls out about a dozen times,
having the bolt release wander up and bind the hammer pivot pin.
lining up the holes for the hammer pivot pin, with the thumb safety coming loose and the ball detent falling out.
and some of those little-STRONG "Molybneiuneiumenum"(sp?) Magnets
and keep thinking I will (accidentally) discover some slick way to get each/all
parts to behave until I can get that pin in place...
When it does 'come together', I want to do a dance in the end-zone!!
Kinda makes me have a little more respect for the surgeon that can replace
a heart-valve... and not have to say "oops" three or four times.
-
bearandoldman

- Ye Loquacious Olde Pharte

- Posts: 4194
- Joined: Tue Aug 16, 2005 10:30 am
- Location: Mid Michigan
hammer pin and spring
Maybe I am just a backward Polak but as I have changed the sear on all my 22/45's, have never done it on a steel frame gus so it may not be ther best way. On my first gun, I had an awful time getting the pin through the hammer and spring from the left partially because I have a blur in the center of my right vision and have very poor short distance depth perception, also had a very hard time witht the sear pin, sear and spring.. Well after just about losing my mind, I tried inserting the pin through the sear and holding the spring in a pair of them surgical clamp pliers ( in the 60's we called them roach clips) Toy will know the proper name as he is a paramedic. So I decided that maybe this method would wotrk with the hammer also, well it did the trick for me. This system works for me, there is more than one way to skin a cat if that is what you want to do, it does not really interest me. Holding the safety in and the sear forward I insert the pin into the hammer, the reach in with a pick and put tension on the tail of the spring and push the pin the rest of the way through. I think i have that right as it is a while since I did it last and it is hard for me to describe without actually doing the job.
Remember this old service techs saying " It is nbot the procedure that we use on the job that counts, it is the end result that is of prime inportance.
Remember this old service techs saying " It is nbot the procedure that we use on the job that counts, it is the end result that is of prime inportance.
You have great day and shoot straight and may the Good Lord smile on you.