LCI cover plate
Moderators: Bullseye, Moderators

Re: Thanks guys
Well I think it looks great and I'd love to have one for mine. If you decide to sell some be sure to let me know.boltbusterdw wrote:Once I get my parts in and run a few hundred rounds through it I will post the results. I do feel better having a thumbs up, especially from Bullseye. I made a few extra as you can see and would be willing to send him one for evaluation. If they work out I may make a few more for the forum members. IMHO, the Mark III's looks worse without the LCI(and the open slot) than they do with the plastic LCI.
BTW, this is how the color combo(from an airgun project) will look like once anodized...
If you find yourself in a fair fight your tactics need work.
Re: Thanks guys
Me too!SKnight wrote:If you decide to sell some be sure to let me know.
Re: Thanks guys
That is just great! I recently bought a Mark III Hunter and have the tweaking bug. My wife likes it so much I think I am going to have to get her one too.boltbusterdw wrote:If you decide to sell some be sure to let me know.
If you do decide to do a run of extras, please let me know. I just wish I had access (and the necessary skills) to equipment to do metal fabrication.

(I have edited this post a number of times, to reflect new thoughts and ideas I tried after the first post. I think this is the final edition ! Sorry it is so long, but I want to be clear on what I did, for the benefit of whoever may use one or more of my ideas.)
Bullseye posted my photos a little farther down
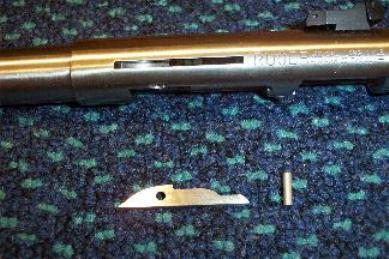
Just finished making my own LCI plug, with some variation. Boltbuster's appears to be aluminum (?), I decided to go all stainless, like the rest of my bullbarrel Mark III.
None of my local hardwares had any stainless stock of any thickness, so after some thought I went for a stainless M20 (metric) fender washer. This will be big enough to hacksaw two plug blanks from, if you're up to the task. The problem with this washer is that it is thicker than the LCI slot, and thinning it took considerable file time and sore finger tips.
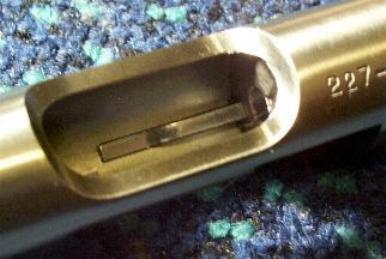
I started with a copy of the original LCI plastic part outlined in plastic sheet from the local hobby shop. The original allowed space between the curved end and the chamber so the LCI could move, so I made my copy's curve about 1/16 oversize, and I left the rear end of my copy about an 1/8 longer to allow tight fitting to the bevel at the back of the slot.
I also noticed that the bevel at the front of the slot is a bit different than the curve into the chamber, so I allowed for that. Makes a little triangle stick out from the curve. Then it was just file and try, file and try, until the plastic copy fit the slot like I intended.
What to watch for is to keep the squared end of the curve flush with the end of the chamber during the trial and error process. I got lucky and got a reasonably good fit on my first plastic copy. Then I scribed it onto my stainless blank.
Do the initial shape of the stainless a bit outside the scribe lines, so you can be extra careful in the final fitting. Once too much is filed off, you can't put it back !! And do your thinning only after you have the beginning shape cut into your blank. Thin (and smooth) until the entire blank will just barely push through the slot.
All I used here is a cheap clamp-on bench vise, a hacksaw, large file and some needle files. A warning here. I wore out two hacksaw blades, and one Nicholson Handy File, and have fairly dulled a second Nicholson. I have a new respect for how hard stainless steel is.
If you could secure stainless stock closer to the right thickness, it would help you, believe me. A little thicker, to allow for doing a good smooth finish, is okay. But a sizable chunk of my time was spent thinning the blank. I spent about two hours a day for nearly two weeks doing the entire project.
My first idea was to use 1/8 inch stainless steel rod to make a half inch pin for the cover. This will replace the original plastic pin exactly, but it will be difficult to remove if it is not an easy fit, so be careful on your hole alignment. Remember the original LCI was spring-loaded, which kept the pin from falling out. Now it may slip out when you disassemble for cleaning. A dab of some sealer over the end may help.
I purposely drilled my hole a tiny bit off-center to keep the cover tight in the slot. It will pull out with with some very small tipped needle-nose pliers.
YOU can also use a 6-32 nylon screw. I bought 6-32 X 3/4" screws. Cut the top off, leaving a 9/16 headless screw. This leaves nearly 1/8 of thread exposed for removal. This will still just clear the grip frame, assembled. You can catch it with needle-nose pliers, or a knife edge. Or, as I figured out to make the pin more reusable, you can screw on a 6-32 T-nut and pull the pin out. A T-nut is a metal disc with a threaded tube in the center, and three teeth on the edge to hold it in wallboard, etc. Any good hardware will have them for around a quarter apiece. I broke the teeth off my T-nut with needle nose pliers, since they aren't needed and could scratch.
My costs were $2 for the washer, $2 for the 1/8 rod, a couple bucks for nylon screws and two T-nuts. The second Nicholson Handy File was $8. I had everything else. Fourteen bucks well spent.
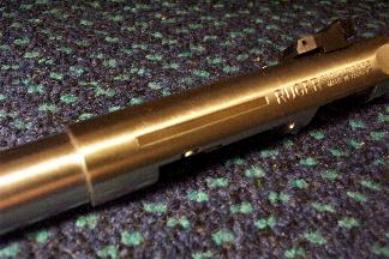
I like my Mark III much better now!
Bullseye posted my photos a little farther down
Just finished making my own LCI plug, with some variation. Boltbuster's appears to be aluminum (?), I decided to go all stainless, like the rest of my bullbarrel Mark III.
None of my local hardwares had any stainless stock of any thickness, so after some thought I went for a stainless M20 (metric) fender washer. This will be big enough to hacksaw two plug blanks from, if you're up to the task. The problem with this washer is that it is thicker than the LCI slot, and thinning it took considerable file time and sore finger tips.
I started with a copy of the original LCI plastic part outlined in plastic sheet from the local hobby shop. The original allowed space between the curved end and the chamber so the LCI could move, so I made my copy's curve about 1/16 oversize, and I left the rear end of my copy about an 1/8 longer to allow tight fitting to the bevel at the back of the slot.
I also noticed that the bevel at the front of the slot is a bit different than the curve into the chamber, so I allowed for that. Makes a little triangle stick out from the curve. Then it was just file and try, file and try, until the plastic copy fit the slot like I intended.
What to watch for is to keep the squared end of the curve flush with the end of the chamber during the trial and error process. I got lucky and got a reasonably good fit on my first plastic copy. Then I scribed it onto my stainless blank.
Do the initial shape of the stainless a bit outside the scribe lines, so you can be extra careful in the final fitting. Once too much is filed off, you can't put it back !! And do your thinning only after you have the beginning shape cut into your blank. Thin (and smooth) until the entire blank will just barely push through the slot.
All I used here is a cheap clamp-on bench vise, a hacksaw, large file and some needle files. A warning here. I wore out two hacksaw blades, and one Nicholson Handy File, and have fairly dulled a second Nicholson. I have a new respect for how hard stainless steel is.
If you could secure stainless stock closer to the right thickness, it would help you, believe me. A little thicker, to allow for doing a good smooth finish, is okay. But a sizable chunk of my time was spent thinning the blank. I spent about two hours a day for nearly two weeks doing the entire project.
My first idea was to use 1/8 inch stainless steel rod to make a half inch pin for the cover. This will replace the original plastic pin exactly, but it will be difficult to remove if it is not an easy fit, so be careful on your hole alignment. Remember the original LCI was spring-loaded, which kept the pin from falling out. Now it may slip out when you disassemble for cleaning. A dab of some sealer over the end may help.
I purposely drilled my hole a tiny bit off-center to keep the cover tight in the slot. It will pull out with with some very small tipped needle-nose pliers.
YOU can also use a 6-32 nylon screw. I bought 6-32 X 3/4" screws. Cut the top off, leaving a 9/16 headless screw. This leaves nearly 1/8 of thread exposed for removal. This will still just clear the grip frame, assembled. You can catch it with needle-nose pliers, or a knife edge. Or, as I figured out to make the pin more reusable, you can screw on a 6-32 T-nut and pull the pin out. A T-nut is a metal disc with a threaded tube in the center, and three teeth on the edge to hold it in wallboard, etc. Any good hardware will have them for around a quarter apiece. I broke the teeth off my T-nut with needle nose pliers, since they aren't needed and could scratch.
My costs were $2 for the washer, $2 for the 1/8 rod, a couple bucks for nylon screws and two T-nuts. The second Nicholson Handy File was $8. I had everything else. Fourteen bucks well spent.
I like my Mark III much better now!
Last edited by ruger22 on Tue Jun 05, 2012 11:29 am, edited 12 times in total.


-
ArmstrongBob
- New member

- Posts: 4
- Joined: Fri Feb 13, 2009 8:24 pm
LCI Not Required
I am running a 22/45 and Mark III without the LCI. Removing the LCI does not make the gun any more, or less, reliable. BUT if you are shooting alot, it makes a BIG difference in cleaning effort. In any event when you happen to get lead splatter, and are left handed, the ejection port will make you a believer in safety glasses.
BTW: Anyone shooting a modified weapon should be aware that in the event of a injury to someone, there could be a liability. (Even if only a fool would consider the injury and the modification to be related)
BTW: Anyone shooting a modified weapon should be aware that in the event of a injury to someone, there could be a liability. (Even if only a fool would consider the injury and the modification to be related)

Re: LCI Not Required
Sounds like something that would happen here in Central Fl... We seem to have more than our share of Ambulance chasers hereArmstrongBob wrote: BTW: Anyone shooting a modified weapon should be aware that in the event of a injury to someone, there could be a liability. (Even if only a fool would consider the injury and the modification to be related)
Bud
Beware the man who only has one gun.
HE PROBABLY KNOWS HOW TO USE IT!!!
Beware the man who only has one gun.
HE PROBABLY KNOWS HOW TO USE IT!!!
Thanks. I don't think I would ever do another one by hand, no way, but the one was worth the effort.
* 2 Ruger Bearcat stainless, w/ EWK ejector housings & Wolff springs
* Ruger SP-101 .22LR, w/ Wolff springs
* 2 NAA Guardian .32ACP
* 3 Zastava M70 .32ACP
* S&W 15-22 Sport (.22LR AR)
* 2 Ruger SR22 .22LR pistols
* Ruger SP-101 .22LR, w/ Wolff springs
* 2 NAA Guardian .32ACP
* 3 Zastava M70 .32ACP
* S&W 15-22 Sport (.22LR AR)
* 2 Ruger SR22 .22LR pistols