Grips fpr MarkIII (long post)

Discuss .22 pistols.

Moderators: Bullseye, Moderators

Post Reply
Oldguy
Regular contributor
Regular contributor
Posts: 51
Joined: Sat Sep 06, 2008 6:15 pm
Location: No. California

Grips fpr MarkIII (long post)

Post by Oldguy » Mon Jan 12, 2009 11:11 am

Here's a set of grips I made for my MarkIII. I have alwasys liked blued guns, and also like wood grips. Nice contrast that I consider good looking. I know I could have bought a set for about $50, but as a woodworker, I figured I could make a set.

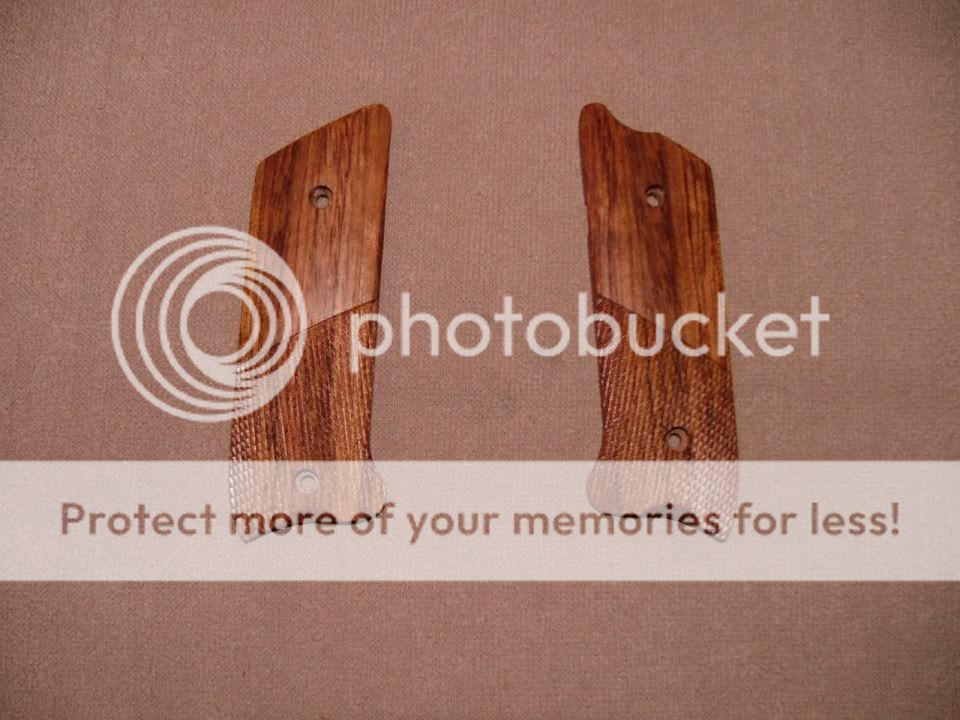
I used the original left grip to make a pattern. I had some Rosewood, cut a couple slabs, drilled the holes, cut out the relief for the bolt catch release, hammer pivot pin, magazine release button, magazine release hold down screw, and the bump at the bottom of the left side that clears the magazine. I chucked a 1/4 router bit in my drill press for this, but wasn't terribly satisfied with the results. More on this later. Using a spokeshave, I trimmed and shaped to get the right contours and feel.

Well, guess what? While they fit (at least the left side), the didn't line up. After a little closer examination, I found the bottom hole on the right is a different position. I cut another slab, repositioned the bottom screw hole on the right, trimmed, contoured, sanded until I was happy.

Screwed them on, only to find out they still didn't line up right. Closer examination revealed that the upper holes are in slightly different positions from left to right. Not off much (maybe 1/32" or so) but enought to make it not quite right.

Being a perfectionist (read anal), I made a new set of patterns: one for the left, one for the right. Satisfied with my results, I cut a couple more pieces of rosewood, and proceeded to rout the reliefs for all the stuff (above) on the left grip. As I said, I wasn't happy with using a router bit in the drill press (turns too slow for proper cutting, and grabs a lot. Not really safe when using something as sharp as a router bit). I have a Dremel, and knew they made a router base for them, so I went and bought one. $32 didn't seem like a bad price, So I bought it. Well, my Dremel is about 25 years old, and guess what? Didn't fit the router base!

Knowing that a Dremel was about the only way it was going to get done, I bought a new Dremel. I justified this by convincing myself I needed a variable speed Dremel that I could use on other woodworking projects as well. $65 later (on sale at Lowes), I was on my way.

Finally made a set that fit, and started to finish them. Looked a little plain without checkering, so I started looking in to what I could do. One of my friends has a couple checking tools, so I borrowed them, and started practicing. Actually worked, but wasn't happy (remember the anal thing, as mentioned above). He only had 2 checking tools: the spacing tool and the small finish cutter. Off to the woodworking store, and they had the starter set (3 handles, 6 cutters) for what came to $58 including tax. Also, something I read (an old gunsmithing book) said I need a veining tool, so I picked up one as long as I was there. $22 seemed a little steep, but I was in it far enough now that I couldn't stop. I was on a mission!

The rosewood grips, while OK, wasn't really the color I was looking for. I returned to the woodworking store, and picked up some Bubinga for about $12. About 4 more practice sets, and I was satisfied that I could actually do this and not be embarrassed by the results. When I went to do the checkering on the final, honest to God grips I was going to put on, the checkering was taking forever, and the bit's weren't cutting like they used to. A little more research, and found out that Bubinga has a lot of something in it that makes iot very hard on cutting tools. Looking at my bits under a magnifying glass, I could see they were, indeed, too dull to finish the grips.

So, I checked MidwayUSA, order some replacements, and $28+ and a few days later (excellent service by Midway, by the way) I was ready. After a few hours, they were done. A couple coats of an oil based finish, I had the final product.

So, to make a long story even longer, I'm in this about $200, many, many hours of tedious, detailed work, but have grips. Here's the results):

Image

Image

Image

User avatar
bearandoldman
Ye Loquacious Olde Pharte
Posts: 4194
Joined: Tue Aug 16, 2005 10:30 am
Location: Mid Michigan

Post by bearandoldman » Mon Jan 12, 2009 11:16 am

Oh hang the cost and the time involved, you got the job done and they look great, there is satisfaction in those facts. Another OLD woodworker, we can buy stuff cheaper than we can make it but we can not purchase SATISFACTION.
You have great day and shoot straight and may the Good Lord smile on you.
Image

User avatar
toyfj40
Master contributor
Master contributor
Posts: 672
Joined: Wed Aug 17, 2005 11:32 am
Location: 76101

Post by toyfj40 » Mon Jan 12, 2009 11:21 am

OldGuy: welcome to the forum.
your grips look GREAT!! thanks for the photos and the story.
Yes, MidWay, has given me great service, too.
I, too, will buy a tool for a task...
when I have to buy tools to fix my mistakes... I have to think a bit... :oops:

-- toy

User avatar
bearandoldman
Ye Loquacious Olde Pharte
Posts: 4194
Joined: Tue Aug 16, 2005 10:30 am
Location: Mid Michigan

Post by bearandoldman » Mon Jan 12, 2009 11:27 am

toyfj40 wrote:OldGuy: welcome to the forum.
your grips look GREAT!! thanks for the photos and the story.
Yes, MidWay, has given me great service, too.
I, too, will buy a tool for a task...
when I have to buy tools to fix my mistakes... I have to think a bit... :oops:

-- toy
Mistake, Hell, them are custom made to my specs.
You have great day and shoot straight and may the Good Lord smile on you.
Image

User avatar
Bullseye
Site Admin/Host
Site Admin/Host
Posts: 6384
Joined: Sun Aug 14, 2005 12:23 pm
Location: USA

Post by Bullseye » Mon Jan 12, 2009 4:19 pm

Those grips accent the blued finish very nicely. $200, oh well, its a labor of love when your making custom grips.

R,
Bullseye
Image

Oldguy
Regular contributor
Regular contributor
Posts: 51
Joined: Sat Sep 06, 2008 6:15 pm
Location: No. California

Post by Oldguy » Mon Jan 12, 2009 5:13 pm

Thanks for the replies. I'm fairly happy with how they look, but am working on a couple other sets.

One set is lacewood, and will have a stippling instead of checkering. I tried stippling on some of the practice grips, and really liked how it looked, so thought I would give it a try.

I am also working on another lacewood set , but am going to try my hand at skip-line checkering.

Then, I have some ebony with some lighter streaks in it that may look pretty good.

By then, I need some target grips.

I can see this not ending any time soon.

User avatar
recumbent
Advanced contributor
Posts: 289
Joined: Sun Aug 20, 2006 6:01 pm
Location: So. Indiana

Post by recumbent » Mon Jan 12, 2009 6:10 pm

Very nice indeed....... :shock:
"I seek not to know all the answers, but to understand the questions."
- Kwai Chang Caine -

scaleman
New member
New member
Posts: 31
Joined: Thu Sep 04, 2008 4:25 pm
Location: Kenosha, WI

Post by scaleman » Mon Jan 12, 2009 9:02 pm

How did you do the checkering?

User avatar
OpsMgr
Regular contributor
Regular contributor
Posts: 101
Joined: Wed Jun 25, 2008 7:04 am
Location: Southeast USA

Post by OpsMgr » Mon Jan 12, 2009 10:37 pm

Really nice grips and thanks for the pics - They are custom, indeed. As I alway like to tell SWMBO - There is no subistute for the proper tool... :lol:
The tree of Liberty must be refreshed from time to time with the blood of patriots and tyrants
- Thomas Jefferson

Oldguy
Regular contributor
Regular contributor
Posts: 51
Joined: Sat Sep 06, 2008 6:15 pm
Location: No. California

Post by Oldguy » Tue Jan 13, 2009 9:26 am

[quote="scaleman"]How did you do the checkering?[/quote]

I used the Dembart starter kit. Here's a link to Midway:

http://www.midwayusa.com/eproductpage.e ... mid=168386

I used 18 lines per inch, and most gunsmiths recommend 16-18 for us amateurs. Really hard wood can take 22-24, but much harder to do. Remember that checkering to primarily to improve your grip, and not for looks. 16-18 lpi work better, look just fine, and won't wear down as fast.

As far as how I did it, I found this link to be the most helpful:

http://forums.1911forum.com/showthread.php?t=182832

Do a practice piece on a flat piece, then shape one and checker a rounded one. It's much different keeping lines straight, and more difficult to get the diamonds right on the rounded over parts.

Other than that, do a couple of practice sets until you feel comfortable. I did about a half dozen pieces until I was comfortable. Be patient, and take your time. Most critical part is the master line, and then laying out the checkering. If the lines aren't straight, it won't be right.

By the way, my wife thinks I'm nuts, but what do I care?

User avatar
Bullseye
Site Admin/Host
Site Admin/Host
Posts: 6384
Joined: Sun Aug 14, 2005 12:23 pm
Location: USA

Post by Bullseye » Tue Jan 13, 2009 10:08 pm

Hand checkering is a laborious job. You got to love what you're doing because it takes quite some time to get it all right. Nice link for the layout and lines.

R,
Bullseye
Image

Dwight45
Regular contributor
Regular contributor
Posts: 90
Joined: Thu Dec 18, 2008 10:40 pm

Post by Dwight45 » Wed Jan 14, 2009 12:36 am

Oldguy, I've done some woodwork, so I know what kind of skill and time went into your project. Oh, and patience. You did an outstanding job. They should be a source of pride for years to come.

Post Reply