Page 1 of 1
Front sight drill/tap depth question.
Posted: Wed Jan 18, 2012 7:22 pm
by boltbusterdw
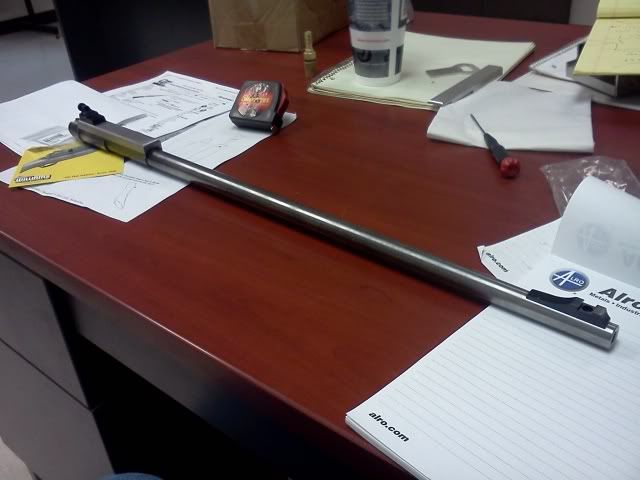
I am currently working on sporterizing an old military rifle and cut the 31" barrel down to 25". I crowned the barrel and need to drill and tap it for a Marbels front sight blade. The O.D. of the barrel measures .642, and the groove diameter of the bore is .308. That leaves a wall thickness of .167 to work with.

My question is this. How deep can you safely drill into the barrel? The screw that came with the sight protrudes .110 from the bottom when the screw is in the sight. I know on some shotguns they actually drill all the way through to install beads, but that would be a horrific thing to do on a rifle

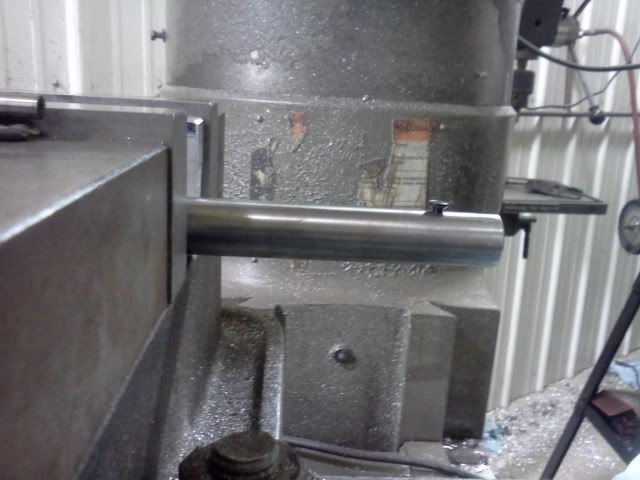
I will be doing this on a Bridgeport mill so I can control the depth along with placing the hole on absolute center. I have no other high powered rifles with front sights to measure. Any input would be greatly appreciated.
Here is the post on my progress with the gun so far.
http://guntalk-online.com/forum/viewtop ... 1709#31709
Posted: Wed Jan 18, 2012 10:40 pm
by blue68f100
I'm no gunsmith but I have D&T many tubular items. I would go no more than ".125" Now if you know what size screw your going to use you can work backwards. You only need 3 threads to get enough strength to hold in steel, 5T in Al. Some time you go the depth = to the dia of the screw. These are pretty std machining guidelines.
Posted: Thu Jan 19, 2012 7:03 am
by Bullseye
How was the original front sight attached to the barrel?
R,
Bullseye
Posted: Thu Jan 19, 2012 10:20 am
by boltbusterdw
Here is the original sight. The barrel had a step on the end and it and the sight set screwed over it with a keyway like slot.
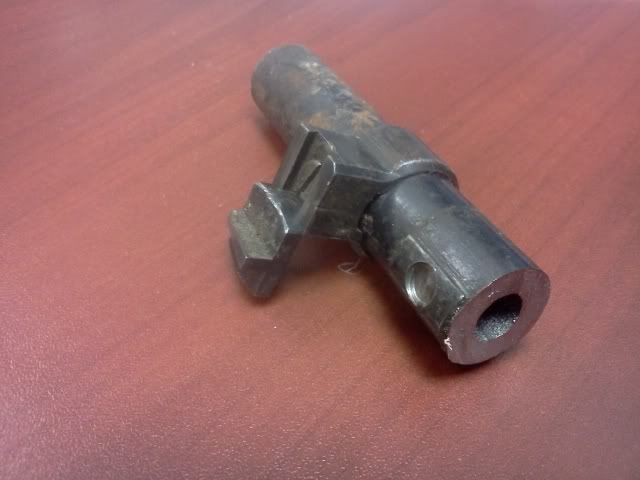


New sight blade...
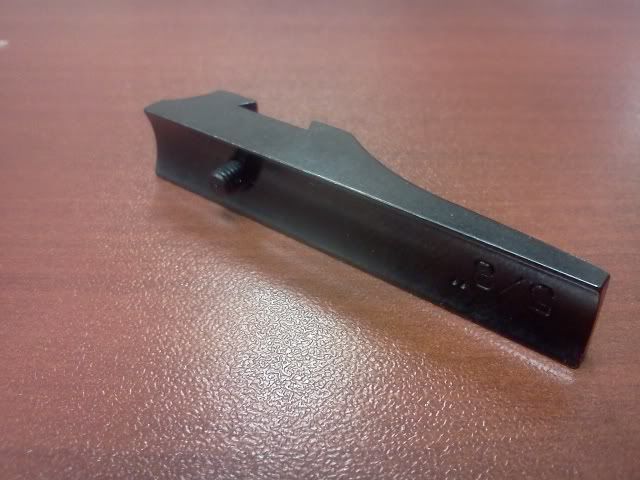
There is only one screw holding the new sight blade on so I want it to be a solid one. The screw it is being held with is a 6-48. 1"/48= .0208 per thread. 3 threads would only be .063. I would like to go as deep as possible though. Does anyone have a gun with factory screwed on sights to check the hole depth?
Posted: Thu Jan 19, 2012 2:11 pm
by blue68f100
The 3 threads is what is required to to be strong enough to hold. My 700BDL is approx 1/8" deep. I counted 5 threads engaged on the screw. It's like any scope mount, it can be very thin, the reason 3 threads hold them solid or be thick as you have room. I would shoot for 5 threads which would put you around 0.1" deep. You will loose anywhere from 1/2 to 1 thread depending on the bottom hole tap. I have ground many down over the years to get all I could. You must use a starter tap in most cases. And some of those are too long to even start on shallow work. When you get toward the bottom you really have to be careful with chips and not break the tap.
I assume your using an end mill to do the D&T on so you can precisely control the depth and have it centered. Using a center to hold the tap handle in alignment to ensure a straight start.
Posted: Thu Jan 19, 2012 3:00 pm
by boltbusterdw
Thanks Blue68
It sounds like your BDL sight screw hole is almost into the bore. It's probably got a barrel diameter of .625, which would only leave .033 between the bottom of the hole and the bore, assuming it is a .308 bore.

I think I will shoot for 5 threads which will put me slightly over .100 deep, leaving me a full 1/16" off the bore.
I would of just scoped the rifle but it ejects out the top, and those scout scope setups with the scope mounted out on the barrel just look funky to me. I've seen an offset scope mount for the gun but I figured I'd give the peepsights a try first.
Posted: Thu Jan 19, 2012 6:12 pm
by blue68f100
My Rem 700 is a Rem 7mm Mag so I have a little more meat.
I pulled the front sight out of the box for my 700 to see how far the screw sticks down. It sticks down 0.90" with close to 4 threads showing. It has 2 screws holding it to the barrel.
So they are only looking for the 3 Threads min.
Posted: Thu Jan 19, 2012 10:06 pm
by Bullseye
Four to five threads is more than enough to hold your new sight fast to the barrel. .090" to .100" will be a sufficient depth. I'd go with a 135° Boring bit rather than a traditional 60° drill bit. This will give you more available threads near the bottom of the hole to hold the screw fast after you use the bottoming tap to finish off the threading. If you're concerned about the screw coming loose add some thread locking sealant to it after degreasing the newly tapped hole, and a little sealant applied the base of the sight too. Tap Magic lubricant will cause the sealant to not cure properly to the metal. Since the end of the barrel has significantly less pressure you will be fine with that depth.
R,
Bullseye
Posted: Fri Jan 20, 2012 11:04 am
by stork
Just an idea. Why not put a second hole in the rear of the front sight base like nearly every other factory rifle used to do? They always had the front screw covered by the sight blade, but they usually had a second screw that showed. If you're set up with decent metal working equipment it shouldn't be any issue.
Just having thoughts here.
FWIW
Posted: Fri Jan 20, 2012 5:27 pm
by boltbusterdw
I like the idea of having only one hidden screw. The bottom of the sight has a radius that matches the barrel. That along with a well engaged screw should be more that strong enough to keep it in place. I would think the engineers at Marbels sights did their homework.
Posted: Sat Jan 21, 2012 4:57 pm
by boltbusterdw
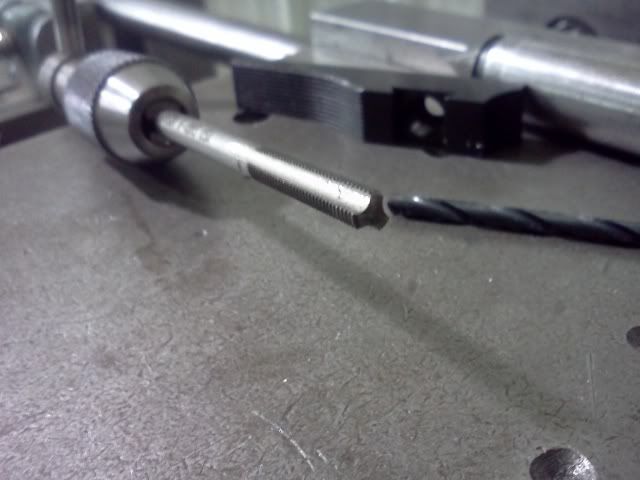
Got it mounted today. I wound up going .125 deep from where the drill touched the barrel. I used a standard 118 degree drill and came out with 4 1/2 threads.
I bought both a plug tap and bottom tap from Midway(Hanson carbon steel). I couldn't even get the plug tap to start. I ran the bottom tap in but it bottomed out at 2 threads. To get to the bottom I had to grind the bottom tap off until there was virtually no lead in.
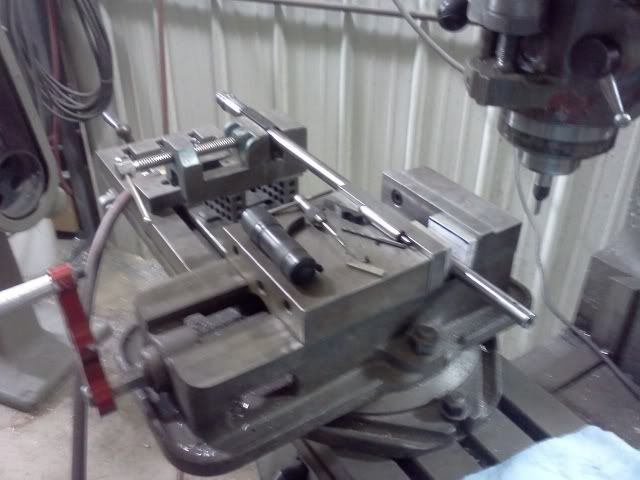
Here is the setup I used, since the barrel already had a sight plane I squared the barrel off it with the small vise. I then leveled the barrel to the table with a machinist level.
Thanks for the helpful input guys.

Posted: Sun Jan 22, 2012 12:30 am
by Georgezilla
Good job! Nice equipment too, I am jealous.
Posted: Sun Jan 22, 2012 8:51 am
by blue68f100
Looks good. Should be nice and solid.