time to say "uncle".
background: I got a 'deal' at a PawnShop on a really good, barely fired
Winchester 94 "Ranger" (basic model) that was an Ugly-Duckling...
due to somebody (even more idiotic than me) tried to put some
Polyurethane on the Fore & Shoulder Stocks... WITHOUT REMOVING THEM!!
Needless to say their sloppy project resulted in "runs" of the Poly
onto and INto the receiver... The 'broker' made me an offer I couldn't refuse.
Well... I got 99% of the Poly removed... a small UV/BlackLight and
Acetone(FingerNail Polish Remover) and a lot of toothpicks and strong
fingernail-scratching has removed all the ugly stuff... some little areas
inside the receiver that had run into the grooves still shows with the
UV light... but this phase of my project is declared done... for now...
well... my reason for this confession...
I have these "instructions" for basic (dis)assembly:
http://www.CastBullet.com/misc/tdown.htm
which, respectfully, do not include detailed information on removing
and COMPRESSING the Hammer Spring onto its 'tang'...
I did not dis-assemble this purposely... but it is not "locked in place"
and my multi-fiddling to remove the Poly on the underside of the
Hammer/Trigger assembly just resulted in a "SPROING" (tm by BatMan)
the other evening... well... it seems that there should be some
creative/insightful method of compressing that stout spring back onto
the tang... with something from the various home-shop parts buckets...
but I'm not working with my LeftBrain this week...
Does anyone have experience going down this path ??
and care to share a map ?? Thanks...
BTW: another time, I'll consider sanding the Poly off the wood and
re-stain/finish it for a completed project... it's been a LOT of detailed
cleaning, but the Blue is in great shape and it has only barely been
fired... it's coming out to be a nice addition to the closet...
however, I'm more of a Marlin-fan, so I guess it'll always be a
"Step-Son-of-a-Gun"...
Win 94 Hammer-Spring Compression ?
Moderators: Bullseye, Moderators
Win 94 Hammer-Spring Compression ?
Last edited by toyfj40 on Mon Jul 23, 2007 8:54 pm, edited 1 time in total.


I don't have experience with these but I did find this link that may help: http://leverguns.sixgunner.com/topic.asp?TOPIC_ID=25453 Take a look at step 5 and see if that will work for you. I realize this is not the same model action but is is very similar, compressing the hammer spring could work in the same manner.
R,
Bullseye
R,
Bullseye

THANKS.
I'm cleaning up for some other (non-firearm) activities today...
I'll re-read later...
My search found a couple InfoPages on 'LeverGuns' website,
but not that forum-posting...
That model is close-enough and the HammerSpring/Tang is
the "same"... however, my first thought of reading it is that
MY SPRING is too-long for that technique...
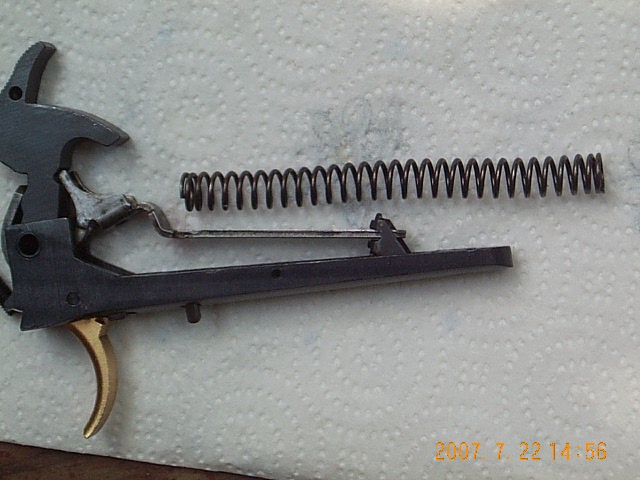
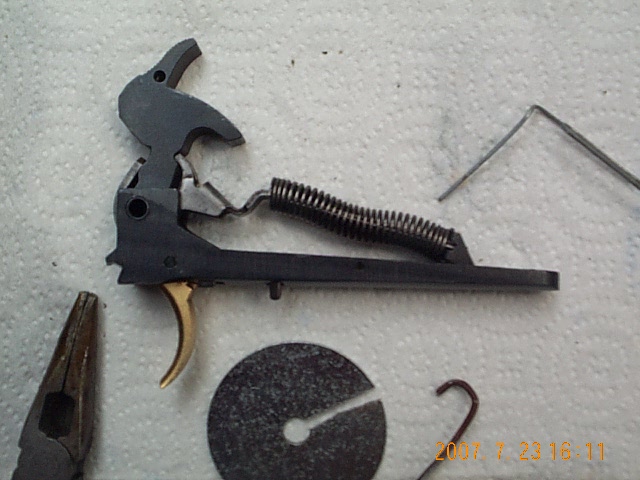
I'll try a quick photo... My spring is about TWICE the length
of the compressed-length...
but, then again... I've been wrong before...
a few times... in sequences... of groups...
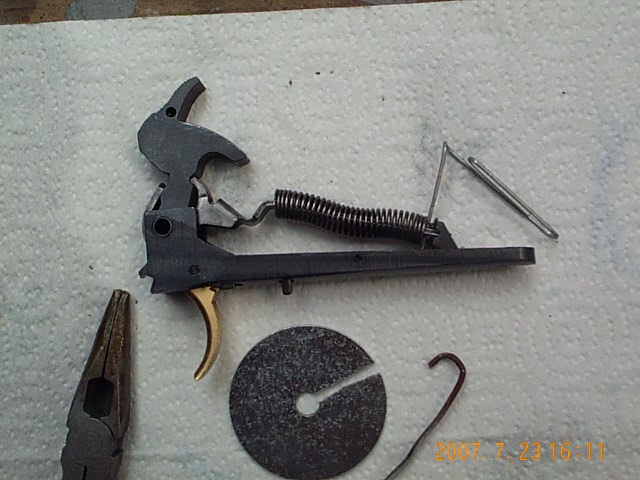
I put the 'SpringTang' into place with the spring beside...
the spring needs to compress to about 0.5x
There is a small "retainer hole' in the tang to allow some
pin (paper clip) to hold the spring in place.. but getting the
spring compressed is my current puzzle...
It is not extremely stout... just it ain't easy and I didn't want
to rush and mess up like the previously referenced pages
where he chipped his stock while making the InfoPages...
I'm cleaning up for some other (non-firearm) activities today...
I'll re-read later...
My search found a couple InfoPages on 'LeverGuns' website,
but not that forum-posting...
That model is close-enough and the HammerSpring/Tang is
the "same"... however, my first thought of reading it is that
MY SPRING is too-long for that technique...
I'll try a quick photo... My spring is about TWICE the length
of the compressed-length...
but, then again... I've been wrong before...
a few times... in sequences... of groups...
I put the 'SpringTang' into place with the spring beside...
the spring needs to compress to about 0.5x
There is a small "retainer hole' in the tang to allow some
pin (paper clip) to hold the spring in place.. but getting the
spring compressed is my current puzzle...
It is not extremely stout... just it ain't easy and I didn't want
to rush and mess up like the previously referenced pages
where he chipped his stock while making the InfoPages...
Last edited by toyfj40 on Mon Jul 23, 2007 8:53 pm, edited 2 times in total.
Hmmm... I just experimented and may be onto something...
I clipped a 2.5" piece of coat-hanger wire and chucked it in my drillpress...
then positioned the Tang&Spring under it, using the Table-elevator-crank
(Not the Quill-Lowering-lever) I let the chuck press down on the spring
while the coat-hanger-wire serves as a guide to keep it all aligned...
I need to devise a surface (like a 0.25" ID Fender Washer) to ride
on top of the spring-against the chuck.... to then be used to manually
compress the spring the remaining 0.25" to insert my retaining-pin...
now, why didn't I think of refining this and posting as my "solution"...
and 'appear to be smart'... instead of a step-at-a-time...
here's what I did and it seemed to "flow with the universe" properly...
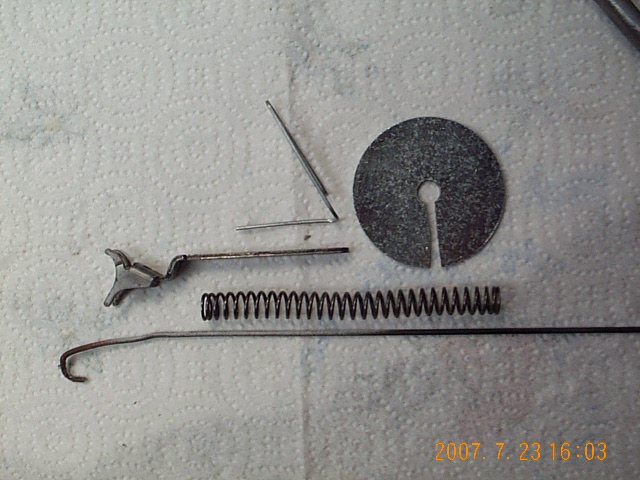
1. got a 2"ODx0.25"ID Fender Washer at the hdw-store,
and on the way home remembered where I already had some... D'oh
2. cut a 6" long piece of straight coat-hanger wire, bent a hook on one end
3. made two hack-saw cuts in the washer as a slot to slide the tang out...
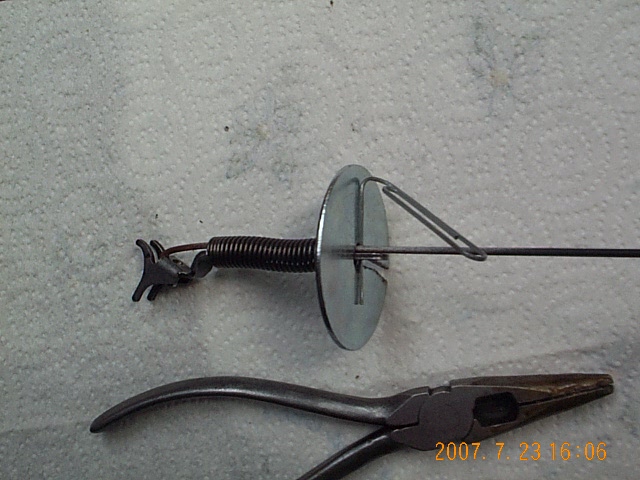
4. placed the cut-washer in the vise
5. placed the spring on the tang
6. inserted the coat-hanger wire inside the spring, along the tang
WITH the hook catching on the "base" of the tang.
7. had a big-paper-clip handy to use as my retainer
8. inserted my coat-hanger-wire thru the cut-washer to snug-up the spring
and proceeded to pull the tang thru the washer, until I could insert the retainer wire.
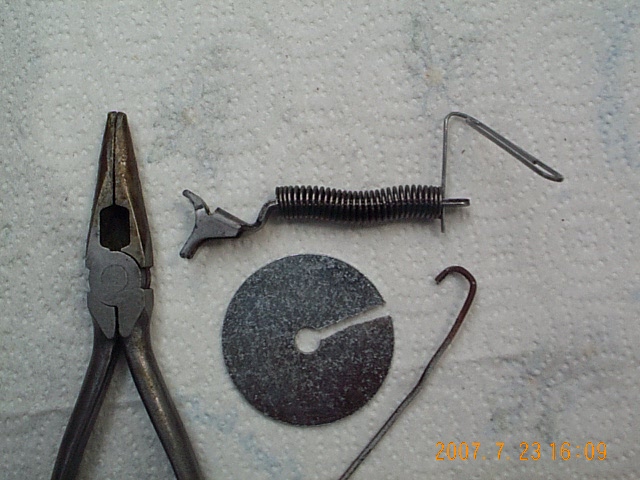
9. pulled the coat-hanger-wire out with the hooked-end
10. wiggled the cut-washer off the tang
11. placed the tang+spring into its place in the trigger/Hammer assembly
12. inserted the trigger/hammer into the receiver
13. attached the stock and finished the MagTube & forestock...
14. done.
action feels good... no longer an Ugly-Duckling...
thanks for listening...
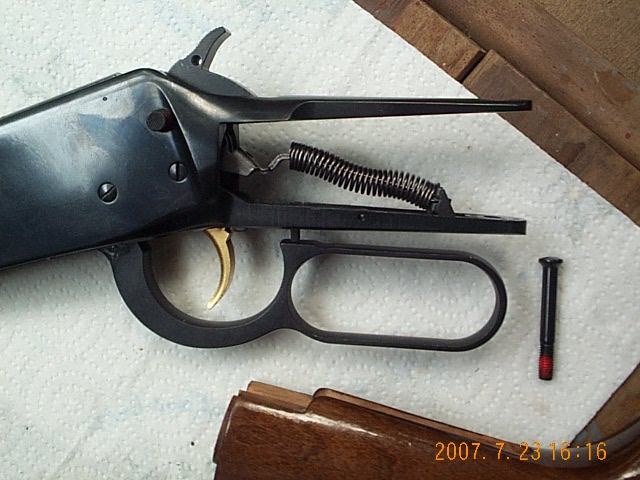

No, those are NOT bullet-holes in the fence above the grip...
although there are days I would not mind taking a few shots
in that-particular direction...
1. got a 2"ODx0.25"ID Fender Washer at the hdw-store,
and on the way home remembered where I already had some... D'oh
2. cut a 6" long piece of straight coat-hanger wire, bent a hook on one end
3. made two hack-saw cuts in the washer as a slot to slide the tang out...
4. placed the cut-washer in the vise
5. placed the spring on the tang
6. inserted the coat-hanger wire inside the spring, along the tang
WITH the hook catching on the "base" of the tang.
7. had a big-paper-clip handy to use as my retainer
8. inserted my coat-hanger-wire thru the cut-washer to snug-up the spring
and proceeded to pull the tang thru the washer, until I could insert the retainer wire.
9. pulled the coat-hanger-wire out with the hooked-end
10. wiggled the cut-washer off the tang
11. placed the tang+spring into its place in the trigger/Hammer assembly
12. inserted the trigger/hammer into the receiver
13. attached the stock and finished the MagTube & forestock...
14. done.
action feels good... no longer an Ugly-Duckling...
thanks for listening...
No, those are NOT bullet-holes in the fence above the grip...
although there are days I would not mind taking a few shots
in that-particular direction...
I tried to count "turns" on a couple of the photos that you referenced earlier.Bullseye wrote:Is that the correct hammer spring for that model? Sure looks way too long and out of place compared to the other ones I've seen.
and estimated about 20-turns on their spring (not sure it was in a "94" )
and mine counts at about 28-turns. ... but I'm pretty sure this is an
"original" rifle... it's really clean... and a recent S/N.
just had the Poly messin' it up...
-
bearandoldman

- Ye Loquacious Olde Pharte

- Posts: 4194
- Joined: Tue Aug 16, 2005 10:30 am
- Location: Mid Michigan
Toy, if you lived out East , they would call that Yankee ingenuity.
Brings to my mind a couple of old sayings. When I was in the service tech business, we always said that the method of getting the job done, meant nothing but it was the end result taht really countered.
Give a lazy man a difficult job and he will find an easy way to do it.
Wouldn't doubt it a bit if the special tools for the job did not look very close to the ones you used.
Made a few special tools in my day also, some of which the service reps copied and had made into factory special too.
You have great day and shoot straight and may the Good Lord smile on you.
Ya'll are gonna love this addendum...
I've actually managed to remove about 96% of the Polyurethane
from the fore+stocks after having worked to remove it from the steel.
It was a lot of ThumbNail-scratching... and there are some minor
nail-scratchings along one side where I had to try harder...
but the underlying wood and finish is really durable!!
It was a great help that the 'Poly-urinator' did nothing to Rough-Up
the original stock/finish... so the Poly did not have any surface to
adhere-to or soak-into... it was the Poly simply ON the original finish.
anyway... getting more proud of this "project"...
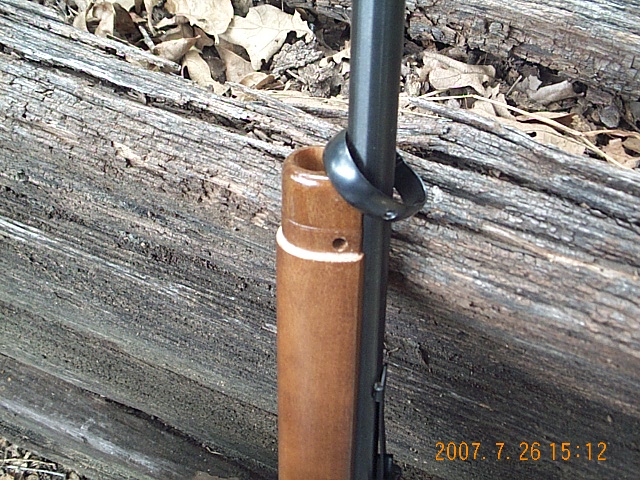
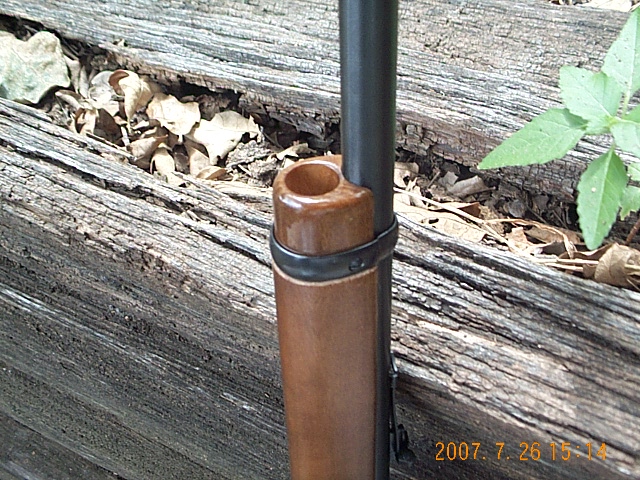
and when assembling the MagTube+ForeStock, the band-screw
would not align to thread into the opposing side of the band...
the screw must run along an under-groove in the barrel which
keeps the fore-stock secure... well, the ridge where the band
snugs against the forestock kept the band about 1/16" too-far-forward !
---Yes, it was inserted/threaded to start with... and I had noticed it
---earlier, I just postponed this "fit" until I got it mostly "Poly-UN-urinated"
well... after much study and flipping a coin... I decided the 'ridge'
needed to move back 1/32 to 1/16"... I got out my trusty
Xacto-Knife and proceeded to score an ever-so-narrow cut to
move that rim/ridge back just a tad... after some careful cutting
actually more like shaving as each stroke was just a little wood...
I thought I made some progress... better... but not a 'fit'...
I got some 200grit paper and an old dinner-knife and folded
the paper around the blade and had a firm means of sanding my
whittle-job... and Voila!! the screw now makes contact...
but the joke seems to be on me...
NOW... I need to stain my newly-exposed wood
and likely APPLY SOME Polyurethane !!!
The forward-tip of the Fore-Stock ahead of the band still has Poly on it.
I'll get to it... behind the band is mostly removed with a now sore ThumbNail!
I've actually managed to remove about 96% of the Polyurethane
from the fore+stocks after having worked to remove it from the steel.
It was a lot of ThumbNail-scratching... and there are some minor
nail-scratchings along one side where I had to try harder...
but the underlying wood and finish is really durable!!
It was a great help that the 'Poly-urinator' did nothing to Rough-Up
the original stock/finish... so the Poly did not have any surface to
adhere-to or soak-into... it was the Poly simply ON the original finish.
anyway... getting more proud of this "project"...
and when assembling the MagTube+ForeStock, the band-screw
would not align to thread into the opposing side of the band...
the screw must run along an under-groove in the barrel which
keeps the fore-stock secure... well, the ridge where the band
snugs against the forestock kept the band about 1/16" too-far-forward !
---Yes, it was inserted/threaded to start with... and I had noticed it
---earlier, I just postponed this "fit" until I got it mostly "Poly-UN-urinated"
well... after much study and flipping a coin... I decided the 'ridge'
needed to move back 1/32 to 1/16"... I got out my trusty
Xacto-Knife and proceeded to score an ever-so-narrow cut to
move that rim/ridge back just a tad... after some careful cutting
actually more like shaving as each stroke was just a little wood...
I thought I made some progress... better... but not a 'fit'...
I got some 200grit paper and an old dinner-knife and folded
the paper around the blade and had a firm means of sanding my
whittle-job... and Voila!! the screw now makes contact...
but the joke seems to be on me...
NOW... I need to stain my newly-exposed wood
and likely APPLY SOME Polyurethane !!!
The forward-tip of the Fore-Stock ahead of the band still has Poly on it.
I'll get to it... behind the band is mostly removed with a now sore ThumbNail!
mostly patience... and thankful for strong fingernails...
it's fun to 'make it work'. actually, the tinkering is the fun-part.
(recall our Victorinox "Tinkerer" knife discussion a couple years ago ?)
There's one more (known) problem... one of the cartridge-guide-thingies
inside the receiver just above the cartridge-insert-trap-door...
has a buggered-thread on it and it is not snug-enough to reliably
cycle the cartridges... so, I need to order some "stuff".
I'll put a few 'gallery loads' thru it and see that it shoots OK
(I basically don't like loud noises) and put it up and look for
something else to Tinker(tm) with...
Talk about irony, I just received one of these lever rifles the other day from my father as a birthday present. It is a pre-64 Winchester Model 94 in 32 Winchester Special. Beautiful rifle made in 1951. The finish is very nice with a few very tiny spots where rust had started to form. Guess I'm going to learn more about these rifles now that I have one of my own.
R,
Bullseye
R,
Bullseye