
My Mark III 22/45 is shut down. The bolt moves back but then sticks. With the bolt release down and can push it and the bolt will drive forward. The trigger is not resetting. So I can not remove the mainspring housing. I suspect the hammer is partially cocked.
Thanks for you comments and help.
Mike I
Need help - Bolt sticking and trigger not resetting
Moderators: Bullseye, Moderators


What kind of Mark III 22/45 is this? (Is it a molded grip or a replaceable grip version?) It is sounding like your hammer pivot pin is not in place properly and may be bent upward under mainspring tension. This would account for the extra friction on the bolt. Take a look at both sides of the hammer pivot pin and ensure they are in their respective pin boss holes and fully supported.
There's a couple of ways to move the hammer fully forward. One is to take a block of wood and place it on the floor. Insert an empty magazine into the frame, squeeze and hold the trigger rearward, then take the pistol, tilt it muzzle down toward the wooden block, and bang it (slam it) very firmly onto the block of wood with the muzzle end of the barrel. This must be accomplished while still holding and maintaining the trigger rearward during the banging process. Don't be shy smack it hard onto the wood. Then check to see if the hammer is forward by first removing the magazine then the mainspring housing. If the housing is still stuck, repeat the process it may take a few tries.
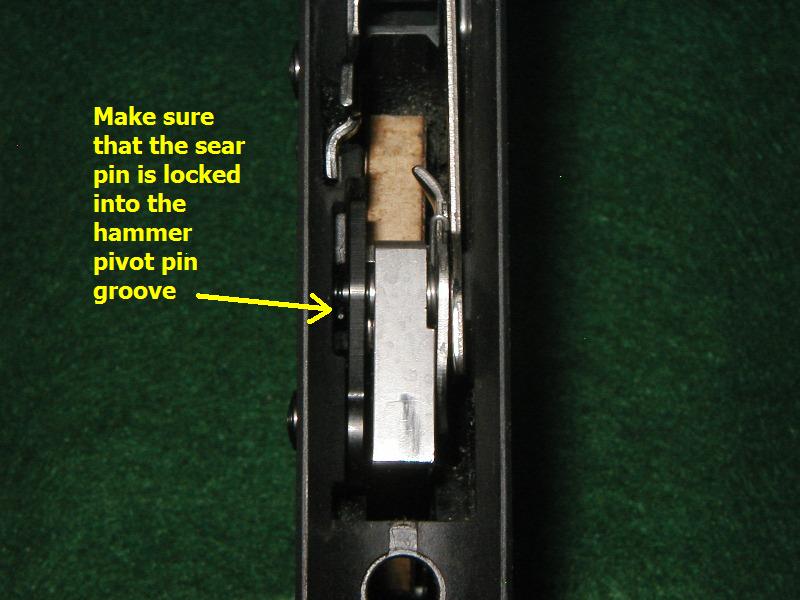
Once you can disassemble the pistol your most likely cause will be the long leg of the sear spring is not located on the back side of the hammer pivot pin groove. This will allow the hammer pin to move because it is not locked in place properly in the frame.

Note- on a replaceable grip 22/45 (Mark III) Ruger has returned to using a straight pivot pin not one with a head on one side. The thought is the installed grip panels will capture the pin and prevent lateral movement in the frame.
R,
Bullseye
There's a couple of ways to move the hammer fully forward. One is to take a block of wood and place it on the floor. Insert an empty magazine into the frame, squeeze and hold the trigger rearward, then take the pistol, tilt it muzzle down toward the wooden block, and bang it (slam it) very firmly onto the block of wood with the muzzle end of the barrel. This must be accomplished while still holding and maintaining the trigger rearward during the banging process. Don't be shy smack it hard onto the wood. Then check to see if the hammer is forward by first removing the magazine then the mainspring housing. If the housing is still stuck, repeat the process it may take a few tries.
Once you can disassemble the pistol your most likely cause will be the long leg of the sear spring is not located on the back side of the hammer pivot pin groove. This will allow the hammer pin to move because it is not locked in place properly in the frame.
Note- on a replaceable grip 22/45 (Mark III) Ruger has returned to using a straight pivot pin not one with a head on one side. The thought is the installed grip panels will capture the pin and prevent lateral movement in the frame.
R,
Bullseye

I tried without any success to move the hammer forward by slamming the muzzle against a wooden board on the floor with a mag inserted and depressing the trigger. I hit it hard maybe 10 times, I mean hard enough that it was hurting the web of my hand on the back strap. You mentioned a couple of ways, maybe we need to move on to the second way. Again thanks for helping me.
Mike I
Mike I
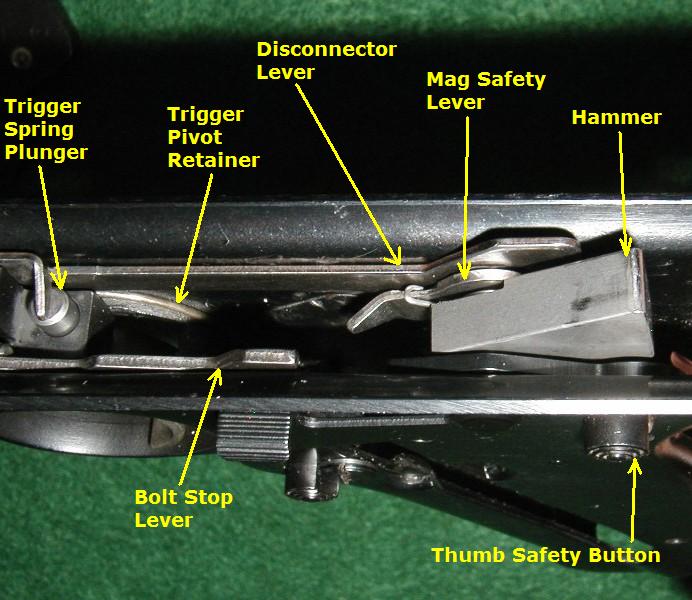
Another way is a little more tricky and you'll need some long tools to accomplish it. One is a long shafted flat bladed screwdriver. The second is a long 90° hooked scribe. The object is to use the scribe to manually release the sear. The trick is you have to grab it by going up through the magazine well with the bolt closed. What complicates this even more is you need to use the long screwdriver to activate the magazine safety hook and release the sear to move it, both at the same time.

This is how you have to hook the sear by grabbing the slot on the right side that the disconnector tab rides in. Obviously I cannot show this technique by photographing down through the magwell so I've utilized a picture on a regular framed Mark pistol. This is a tight fit for the two tools and it will take a lot of patience to accomplish.
There is another way to do this but it will mangle your sear spring. The spring can be straightened out again but this technique can weaken the spring. If you go this route you have to drift out the sear pivot pin with a punch. Once out the hammer will be released after you move the magazine safety disconnector hook. Then disassemble the pistol, completely detail strip the frame, straighten out the sear spring, and reassemble the pistol. Here is a step by step diagram for detailed stripping and reassembly of the Mark III 22/45. http://www.guntalk-online.com/2245detailstripping.htm just scroll down the page as needed and follow the steps.
Here is a picture of how you sear spring must look before reinstalling it.
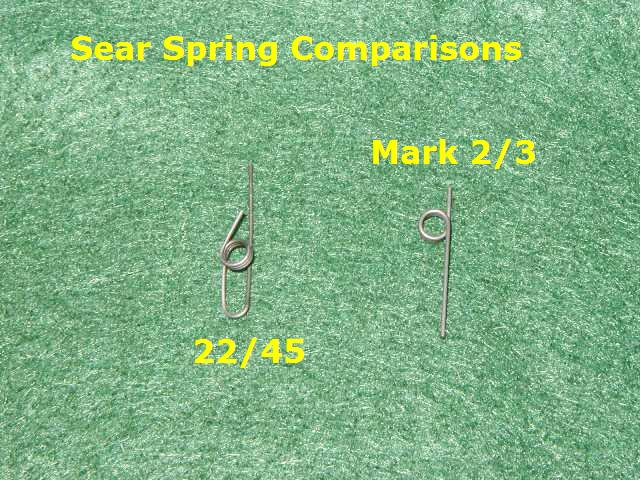
You need the 22/45 sear spring long leg to be in a straight alignment with the bottom line (leg) of the loop. (Like the one in the picture)
Here is a picture of what to expect if you punch out the sear pivot pin.
R,
Bullseye
This is how you have to hook the sear by grabbing the slot on the right side that the disconnector tab rides in. Obviously I cannot show this technique by photographing down through the magwell so I've utilized a picture on a regular framed Mark pistol. This is a tight fit for the two tools and it will take a lot of patience to accomplish.
There is another way to do this but it will mangle your sear spring. The spring can be straightened out again but this technique can weaken the spring. If you go this route you have to drift out the sear pivot pin with a punch. Once out the hammer will be released after you move the magazine safety disconnector hook. Then disassemble the pistol, completely detail strip the frame, straighten out the sear spring, and reassemble the pistol. Here is a step by step diagram for detailed stripping and reassembly of the Mark III 22/45. http://www.guntalk-online.com/2245detailstripping.htm just scroll down the page as needed and follow the steps.
Here is a picture of how you sear spring must look before reinstalling it.
You need the 22/45 sear spring long leg to be in a straight alignment with the bottom line (leg) of the loop. (Like the one in the picture)
Here is a picture of what to expect if you punch out the sear pivot pin.
R,
Bullseye
"drift out the sear pivot pin with a punch. Once out the hammer will be released after you move the magazine safety disconnector hook"Bullseye wrote:You can straighten out the bent spring legs with a set of parallel jawed pliers, or carefully with a set of needle nosed pliers. Once straightened, they tend to work well. It is repeated bending that will weaken the spring.
R,
Bullseye
Which pin is the sear pivot pin? Which way do I move the magazine safety disconnector hook?
Mike I
The sear pivot pin is the lower pin under the grip panels.
Like in this picture it is just under the hammer pivot pin only on the 22/45 model.
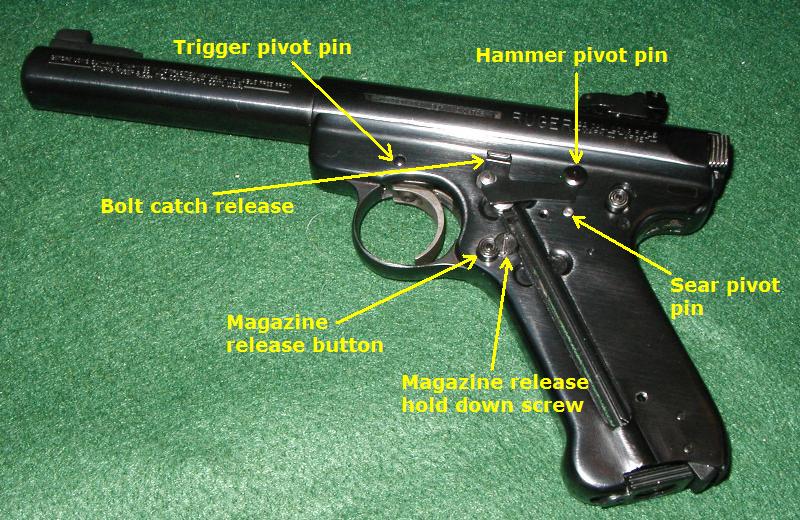
Moving the magazine safety hook means using a long shafted flat blade screwdriver up through the magazine well, use the blade and push up the hook to release the sear face once the pivot pin has been drifted out of the frame. Then you can disassemble the pistol via the normal route as the mainspring will no longer be under tension.
Some other references that may be useful.
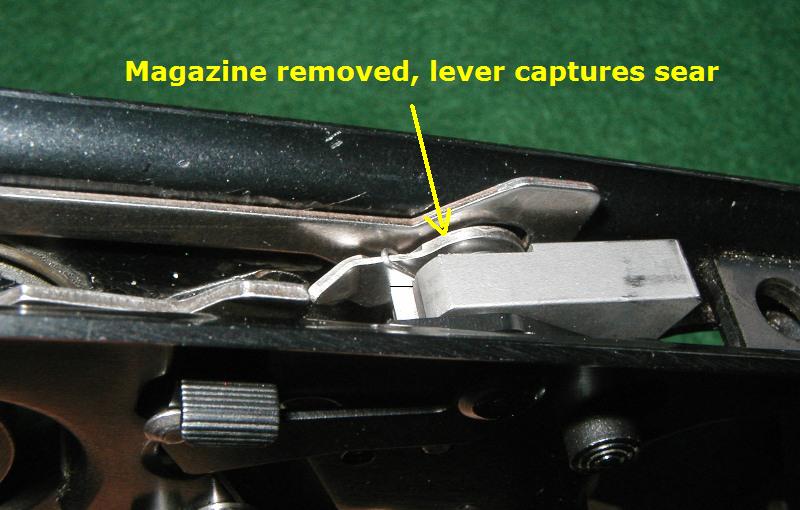
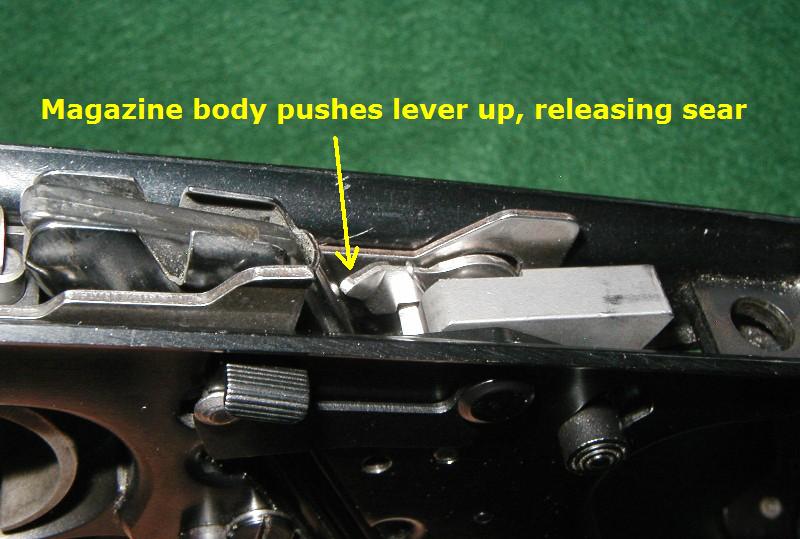
The screwdriver blade simulates the magazine body to release the sear face.
R,
Bullseye
Like in this picture it is just under the hammer pivot pin only on the 22/45 model.
Moving the magazine safety hook means using a long shafted flat blade screwdriver up through the magazine well, use the blade and push up the hook to release the sear face once the pivot pin has been drifted out of the frame. Then you can disassemble the pistol via the normal route as the mainspring will no longer be under tension.
Some other references that may be useful.
The screwdriver blade simulates the magazine body to release the sear face.
R,
Bullseye
I finished the dis assembly. Went very smooth. My sear spring did better than your example and getting back to correct shape should not be hard. Will check back in when I re assemble tomorrow.Mike I wrote:Good news to report. The gun is now field stripped. I will read and study the full dis assembly before starting. I will report back, Thanks I think the hard part is over.
Mike I
Mike I
That's great Mike! I wanted to show you an extreme example, not mine by the way, as so you could know what is possible for that spring. Most times the bent spring is only slightly out of alignment but every now-and-then one hangs up and gets pretzeled like the example photo I posted.
I'm sorry I didn't get right back with you but I have been extremely busy as of late, lots of folks getting ready for the Nationals and needing urgent work done before going off to Perry - this is always a busy time of the year!
You should be fine once you get everything back together. Just follow all the steps on the web help page, and if you get hung up anywhere, drop me a message and I'll talk you through it.
R,
Bullseye