Mark III Upgrade-Detail strip

Discuss .22 pistols.

Moderators: Bullseye, Moderators

User avatar
toyfj40
Master contributor
Master contributor
Posts: 672
Joined: Wed Aug 17, 2005 11:32 am
Location: 76101

Re: hammer pin and spring

Post by toyfj40 » Sat Aug 26, 2006 3:02 am

bearandoldman wrote:Toy will know the proper name as he is a paramedic.
are you speaking of "Vise-Grips" ??
or perhaps a Burdizzo
Here is a 15" model I have from the 'family ranch'...
Image

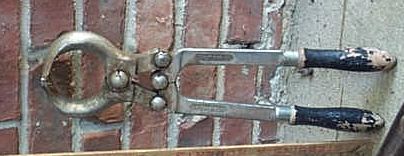
or maybe just a Hemo-Stat.

Uh... "para-medic"... me? I get woozie just trimming my toe-nails :lol:
I'm a retired Compu-Geek/Gnerd before the terms meant anything.
I've got PaperTape, 8"-floppies, GreenBar-Paper, 80-column cards, 7 and 9track tape
running in my veins... had my first eMail-address back in '82,
and was well-established back in the 70s as a Corporate-MainFrame-Analyst
long before those hobby-brats began playing with that 'Altair'
or wrote a program called 'Visi-Calc'... and changed "computing"...
and not necessarily for the better...
I still like to use my SlideRule rather than one of those Reverse-Polish-Notation
(NO insult intended to any Polocks reading this far) calculators.
( I still have my Texas SpeedRule that I used in 60s UIL-competition)
Yes, CellPhones are very nice and lots of Pluses...
but... related technology development also produces the RFID chips
you'll soon be wearing behind your ear !!
(they are coming in your PassPorts now and Credit-Cards and Drivers-License soon)
so, prepare your RFID-blocking Wallet...

greener

Post by greener » Sat Aug 26, 2006 7:07 am

It's all just a matter of practice. For folks with 10 thumbs like me, it takes a lot of practice. I would have been surprised if it had gone easy and quick the first time. The worst that could happen is that I put all the parts in a box, add a blank check and go off to a gunsmith. (My last detailed strip and cleaning of an antique mantel clock movement went to a clockmaker that way.) With Bullseye's Detail Strip, the instructions were so well done, that even I could do it.

The hammer assembly appears to line up by pushing it down and foreward and rocking the hammer back toward the rear of the pistol. The trigger spring on the VQ trigger is stronger than the standard spring, which makes keeping the disconnector assembly in place a bit more challenging. I used a small screw driver from the right side to hold all that in place while I fumbled around with lining up the hammer bushing with the hammer pin from the right. It kept the parts from coming out of the receiver every time I relaxed.

The end result was, I hope, worth it. Besides it was fun doing it, even though my wife wouldn't let the dog stay in the room because of the "technical" language used at times.

greener

Post by greener » Sat Aug 26, 2006 7:39 am

Toy: you are showing your age. The only slide rule I kept was my Post. One of my kids was playing with it and I told them to be sure to turn it off when they finished because batteries were hard to find. He spent a while looking for the power button.

User avatar
bearandoldman
Ye Loquacious Olde Pharte
Posts: 4194
Joined: Tue Aug 16, 2005 10:30 am
Location: Mid Michigan

Post by bearandoldman » Sat Aug 26, 2006 10:24 am

greener wrote:Toy: you are showing your age. The only slide rule I kept was my Post. One of my kids was playing with it and I told them to be sure to turn it off when they finished because batteries were hard to find. He spent a while looking for the power button.
Toy, hope it cools off in DFW so you can go shoot the Great Eight. That is the advantage of using an indoor range as the weather is alway predictable. As you know here in Michigan, in the winter wee can get down to no temperature at all with the wind blowing and you an your pistola could freeze solid at any time. Did you ever check that link to the Scottsdale gun club I sent to see the range setuup? Yes Toy hemostatis the name I was thinking of, still thought they wee called "roach clips" more than the technical name. Sorry, in one of my snior moments I got you and a friend in NC confused, he is the paramedic and firefighter, had been contactt with him earlier and my train of thought just got deraailed.
http://www.scottsdalegunclub.com go to the orientation video and take a look.
Toy and Greener, have not seen one of the old educated guessing sticks since the late 60's when I was in the tool engineering and machinist phase of my life and the first real engineering calculators firs appeared. Also use to progem for 3 Cinitimatic mills we had in the shop that were CNC on one inch paper tape with 8? rows of holes and ran an odd parity check.
You have great day and shoot straight and may the Good Lord smile on you.
Image

greener

Post by greener » Sat Aug 26, 2006 1:01 pm

Len: Quit spreading the rumor that it gets cold in Michigan. Last time I went salmon fishing in May out of Lexington it wasn't snowing all that hard. My eldest smoked a turkey last Thanksgiving and only whined a little about it being 17°F and hadn't been above freezing for a week.

Checked out my VQ additions to the MK III this morning. Very nice improvement in the way the pistol shot and felt. Was going to stay longer and dink around but decided that shooting with the temperature at 95 and climbing wasn't that productive.

greener

Post by greener » Sat Aug 26, 2006 1:43 pm

Toy: I've found just the tool for putting in the hammer and any other small job you might have. Plan to have one in my range bag soon as possible.

Image

it can be yours for only $1200.

85 blades.


http://www.outdoorlife.com/outdoor/phot ... 10,00.html

User avatar
toyfj40
Master contributor
Master contributor
Posts: 672
Joined: Wed Aug 17, 2005 11:32 am
Location: 76101

Post by toyfj40 » Sat Aug 26, 2006 8:10 pm

greener wrote:I've found just the tool for putting in the hammer and any other small job you might have. Plan to have one in my range bag soon as possible.
Now THAT sets the limit out there a little further...
I'll start saving-up right away, I'll accept contributions... just call "BR-549"

User avatar
bearandoldman
Ye Loquacious Olde Pharte
Posts: 4194
Joined: Tue Aug 16, 2005 10:30 am
Location: Mid Michigan

Post by bearandoldman » Sat Aug 26, 2006 8:47 pm

toyfj40 wrote:
greener wrote:I've found just the tool for putting in the hammer and any other small job you might have. Plan to have one in my range bag soon as possible.
Now THAT sets the limit out there a little further...
I'll start saving-up right away, I'll accept contributions... just call "BR-549"
And make sure you ask for Junior or if he ss not available Toy may be able to take care of you.
You have great day and shoot straight and may the Good Lord smile on you.
Image

User avatar
bearandoldman
Ye Loquacious Olde Pharte
Posts: 4194
Joined: Tue Aug 16, 2005 10:30 am
Location: Mid Michigan

Post by bearandoldman » Sat Aug 26, 2006 8:52 pm

greener wrote:Len: Quit spreading the rumor that it gets cold in Michigan. Last time I went salmon fishing in May out of Lexington it wasn't snowing all that hard. My eldest smoked a turkey last Thanksgiving and only whined a little about it being 17°F and hadn't been above freezing for a week.
17 degrees is not really that cold, I shoot sporting clays all winter and in colder temps that that. Now when you got no temperature at all, that is cold and aythng lower than that really does not make that much difference.
You have great day and shoot straight and may the Good Lord smile on you.
Image

greener

Post by greener » Sat Aug 26, 2006 9:17 pm

bearandoldman wrote:
greener wrote:Len: Quit spreading the rumor that it gets cold in Michigan. Last time I went salmon fishing in May out of Lexington it wasn't snowing all that hard. My eldest smoked a turkey last Thanksgiving and only whined a little about it being 17°F and hadn't been above freezing for a week.
17 degrees is not really that cold, I shoot sporting clays all winter and in colder temps that that. Now when you got no temperature at all, that is cold and aythng lower than that really does not make that much difference.
Don't know about that. I took my Scout Troop out for a Polar Bear every winter. Some of the less than no temperature weekends got a bit nippy by the second morning of sleeping out. Also arranged Wilderness Survival Merit badge weekend on weekends that it snowed.

User avatar
Bullseye
Site Admin/Host
Site Admin/Host
Posts: 6382
Joined: Sun Aug 14, 2005 12:23 pm
Location: USA

Post by Bullseye » Tue Aug 29, 2006 10:36 pm

Well after reading all of this I'm not sure where to start. Is someone having a problem aligning their magazine disconnector and hammer parts? Or, is this problem solved?

I'm seeing everything clearly shown in the pictures as far as positioning. But, I see this all the time so it would appear to me as fully shown. How can I make the picture more self explanatory. Someone help me understand where they're not able to see clearly and I'll come up with more shots to help illustrate the parts relationships.

I keep a few pairs of hemostats in the tool box for working with small parts and springs. The ability of this tool to clamp onto the spring and reach way down into tight places is invaluable in firearm work. Places like Harbor Freight Tools has them available commercially. Thse work real well on ruger sear installations too.

How do I keep everything from jumping all over the place. No I don't have four hands. I usually line up the hammer pivot pin just like I've shown in the picture - right on the edge of the thumb safety ready to push through the hammer bushing when everything's aligned. But someone could use a punch installed from the right to hold everything secure and alighned until the hammer pivot pin is seatted fully. Pushing in on the hammer pivot pin forces the punch out of the right side when the pin is fully seated. Using a punch eliminates the need for contortionism or octopod dexterity skills.

Hope this helps.

R,
Bullseye
Image

User avatar
bearandoldman
Ye Loquacious Olde Pharte
Posts: 4194
Joined: Tue Aug 16, 2005 10:30 am
Location: Mid Michigan

Post by bearandoldman » Tue Aug 29, 2006 10:54 pm

Bullseye wrote:
I keep a few pairs of hemostats in the tool box for working with small parts and springs. The ability of this tool to clamp onto the spring and reach way down into tight places is invaluable in firearm work. Places like Harbor Freight Tools has them available commercially. Thse work real well on ruger sear installations too.

How do I keep everything from jumping all over the place. No I don't have four hands. I usually line up the hammer pivot pin just like I've shown in the picture - right on the edge of the thumb safety ready to push through the hammer bushing when everything's aligned. But someone could use a punch installed from the right to hold everything secure and alighned until the hammer pivot pin is seatted fully. Pushing in on the hammer pivot pin forces the punch out of the right side when the pin is fully seated. Using a punch eliminates the need for contortionism or octopod dexterity skills.

Hope this helps.

R,
Bullseye
Bulaye, yes hemostats or "roach clips" are and invaluable tool, a straight and a curved is all you need. Another good toool from Harbor Freight is the 5 inch lighted magnifier, it really heps this old man out.
The method you describe for putting in the hammer pin is probably good for a steel frame Mark, but on the 22/45's you also have to contend with the tail end of the sear spring thqt snaps into the groove to retain the pin. That is the reason to use a pilot pin or punch for alingment and insert the pin from the right hand side, thee you can cock the tail of the spring and finish pushing the pin until it snaps into the groove in the pin. Getting the pin through the safety and tensioning the sear spring and holding the hammer etc is extremely difficult, so I devised the other way as it semmed to be easier for me, Whatever works for you to get the job done is the proper method. Take care, Len.
You have great day and shoot straight and may the Good Lord smile on you.
Image

greener

Post by greener » Tue Aug 29, 2006 10:58 pm

I think Bud33 and Toy mentioned how much fun it was to get the hammer and disconnector back in. I used a screw driver to hold in in place while I finished lining up the holes. I would have used a punch as you suggested, but the screw driver was closer. I sent you a bunch of pictures of my assembly and one of them shows the less than elegant solution.

The only other thing I found easier was to lift the disconnector to the vertical when depressing the trigger pin retaining spring. I couldn't find anything small enough to work as shown in your picture.

User avatar
Bullseye
Site Admin/Host
Site Admin/Host
Posts: 6382
Joined: Sun Aug 14, 2005 12:23 pm
Location: USA

Post by Bullseye » Tue Aug 29, 2006 11:16 pm

The only other thing I found easier was to lift the disconnector to the vertical when depressing the trigger pin retaining spring. I couldn't find anything small enough to work as shown in your picture.
It can be easier if your pistol is in this configuration.

Image

I showed how to do a quick removal/installation without a detail stripping to aid those who are trying to adjust a front mounted pretravel screw. I used a very small Allen wrench to unlock the trigger pivot pin.

I got your pictures but haven't had time to look them over yet. Returned very late last night and I'm still catching up on work. I'll give them a good look tomorrow. The first few I saw appeared pretty good to me. I'm sure I'll find some highly useful shots in the bunch. Thanks for those.

R,
Bullseye
Image

greener

Post by greener » Tue Aug 29, 2006 11:38 pm

First time through I wasn't sure if depressing the spring in with the disconnector up would work. When I coudn't find anything small enough to fit when it was down (or couldn't find the spring), I put it in that position and had no problems.

Post Reply